

Tired of wasting time searching through scattered documents and emails for basic client information? As an agency owner, you know this chaos harms productivity and impacts your bottom line. What if there was a better way?
Imagine having all your prospect and client data organized in one central hub. With ClickUp, a project management software, you can easily systemize your entire sales workflow and scale to 7-figures and beyond.
This guide will show you how to structure, automate, and manage your sales CRM pipeline in ClickUp. You'll have an efficient, deal-closing system that keeps your business ahead by the end.
Whether you're just starting or looking to improve, this guide has you covered. Let's begin!
Key Takeaways:
- ClickUp doubles as a cost-effective, customizable CRM solution for agencies.
- Building a CRM from scratch in ClickUp ensures perfect alignment with your unique sales process.
- Essential components include dedicated lists for Deals, Accounts, and Contacts with custom fields and linked relationships.
- Utilize ClickUp's views, automations, and dashboards to streamline workflows and gain actionable insights.
- Integrate your ClickUp CRM with other tools to create a unified sales ecosystem.
How can agencies use ClickUp as a CRM?
Agencies can use ClickUp as a cost-effective CRM by creating a dedicated Sales Space with three core lists: Deals, Accounts, and Contacts.
Customize deal statuses to match your sales pipeline, add relevant custom fields, and link deals to accounts and contacts.
Use ClickUp's views for pipeline visualization, set up automations to streamline repetitive tasks, and build dashboards to track key sales metrics.
Why Use ClickUp as a CRM?
While ClickUp is known for project management, it also excels as a CRM tool with key advantages for agencies and service businesses:
- Centralized Data: Store all client data, including contact information, deal stages, notes, and files, in one place.
- Customization: Tailor your CRM with custom fields, views, and automations to fit your agency's sales process.
- Collaboration: Using ClickUp for both project management and CRM ensures seamless communication between sales and delivery teams.
- Cost-Effectiveness: ClickUp’s affordable plans provide a robust CRM and project management system in one, eliminating the need for separate software.
While dedicated CRM tools like Salesforce or HubSpot offer advanced features, ClickUp provides sufficient functionality for most agencies at a lower cost. Plus, having everything in one tool reduces context switching.
Setting Up Your CRM in ClickUp
The easy option: Download the ClickUp CRM template
Start by downloading a pre-built ClickUp CRM template from the template center.
When you use a template, a pop-up will prompt you to create a new Space or use an existing one for the CRM Folder.
While it seems quick, it often leads to more work. You'll likely need to:
- Fix pre-made statuses to match your pipeline
- Rework views to display relevant information
- Delete unnecessary custom fields cluttering your workspace
Using a template forces you to adapt to someone else's system instead of building a CRM tailored to your specific needs.
The Better Approach: Build Your CRM from Scratch
Instead of using a template, build your CRM from the ground up. The benefits include:
- Full Customization: Tailor every aspect—deal stages, custom fields—to fit your agency's sales process.
- Deeper Understanding: Master your system, making it easier to train your team and troubleshoot issues.
- Seamless Automations: Create automations that perfectly align with your workflow.
- Actionable Insights: Ensure dashboards and reports provide the exact metrics you need.
We'll guide you step-by-step in building a powerful, scalable CRM in ClickUp.
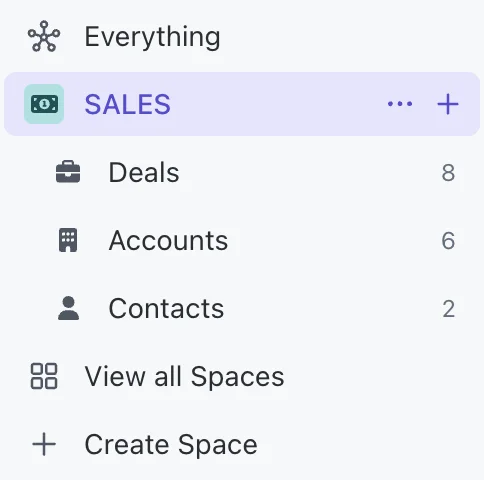
Step 1: Create a dedicated CRM Space
The first step is to create a separate Space in your ClickUp workspace to house your CRM. This keeps your sales data organized and separate from your other work
To create a new Space:
- In your ClickUp sidebar, click the "+" icon next to "Spaces"
- From the menu, select "Create new Space"
- Give your Space a clear, identifiable name like "Sales CRM"
- Customize your Space's icon and color for easy visual recognition
- Click "Create" to finalize your new CRM Space
💡 Pro Tip: Keep your Space statuses simple to start. You can always add more complex workflows later as your CRM evolves.
Step 2: Setup your three Lists
Within your new CRM Space, you'll want to create three core lists:
- Deals: To track your sales opportunities at different stages
- Accounts: To manage key info about your client companies
- Contacts: To store individual client contact details
Consider Deals as your main pipeline, with Accounts and Contacts providing additional context about who the deals are with.
The Contacts list is optional - you can choose to store contact info directly within Deals using custom fields instead. This keeps things simple, especially when setting up automations (which we'll cover later).
💡 Pro Tip: Use ClickUp's "List" view as your default for easy data entry and analysis. You can always switch to "Board" view for a more visual pipeline
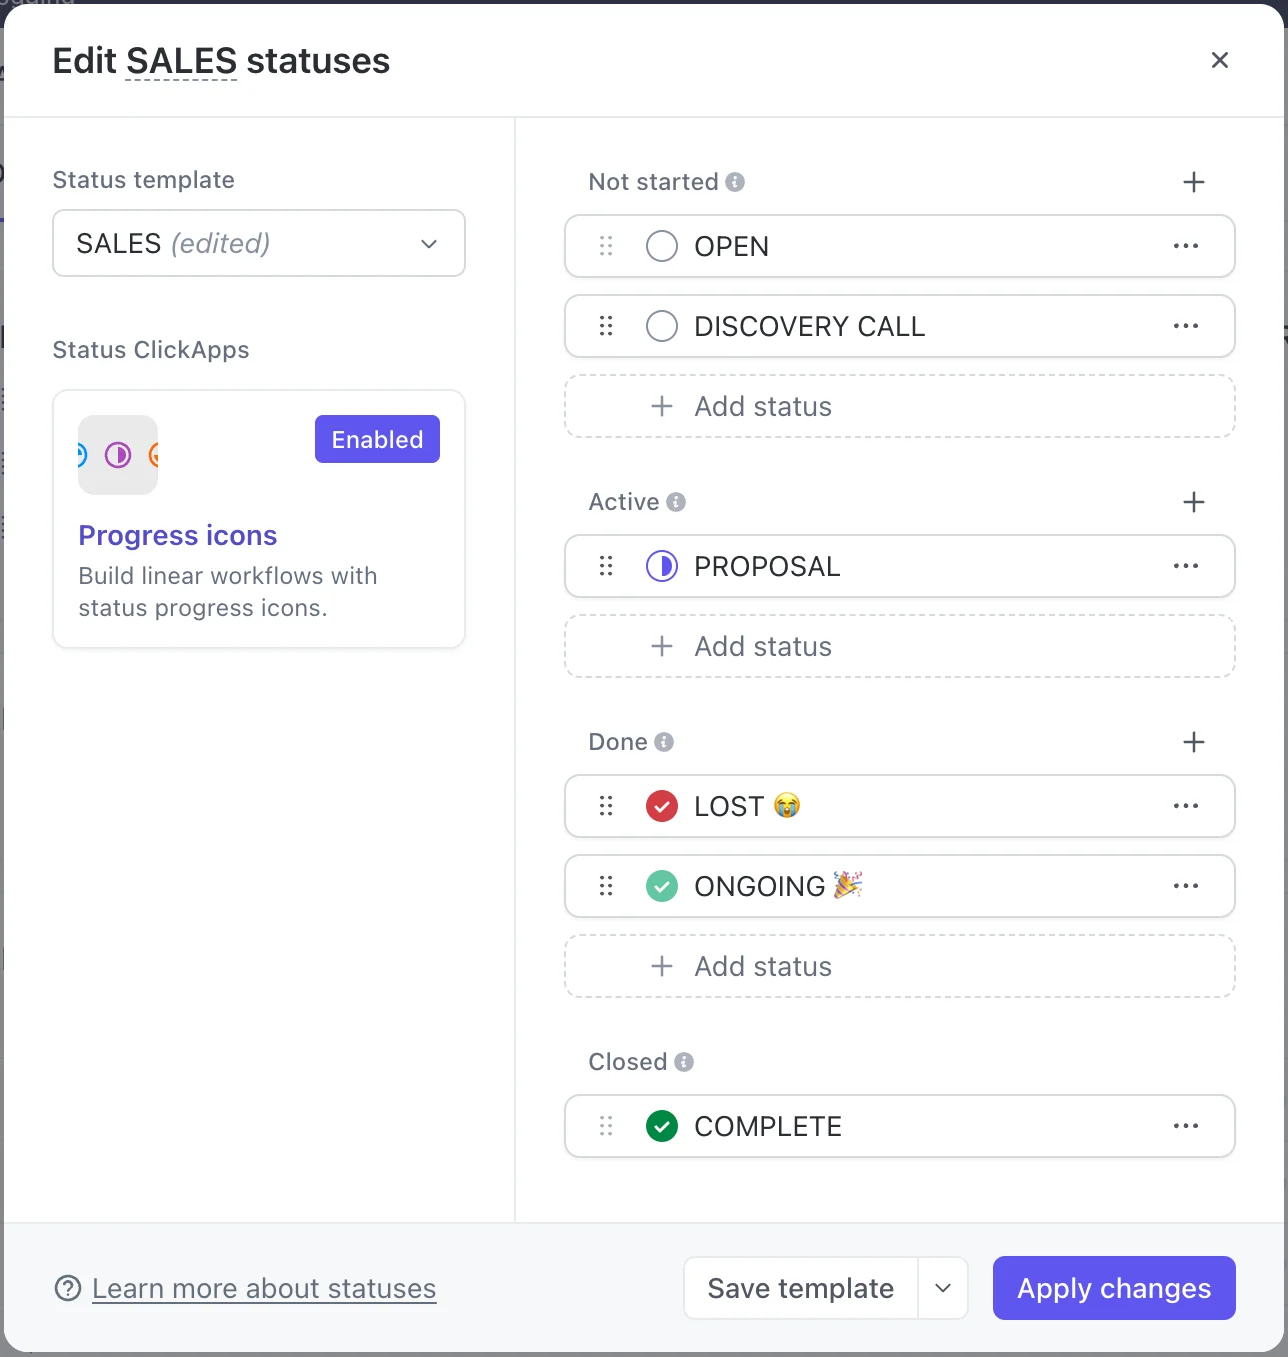
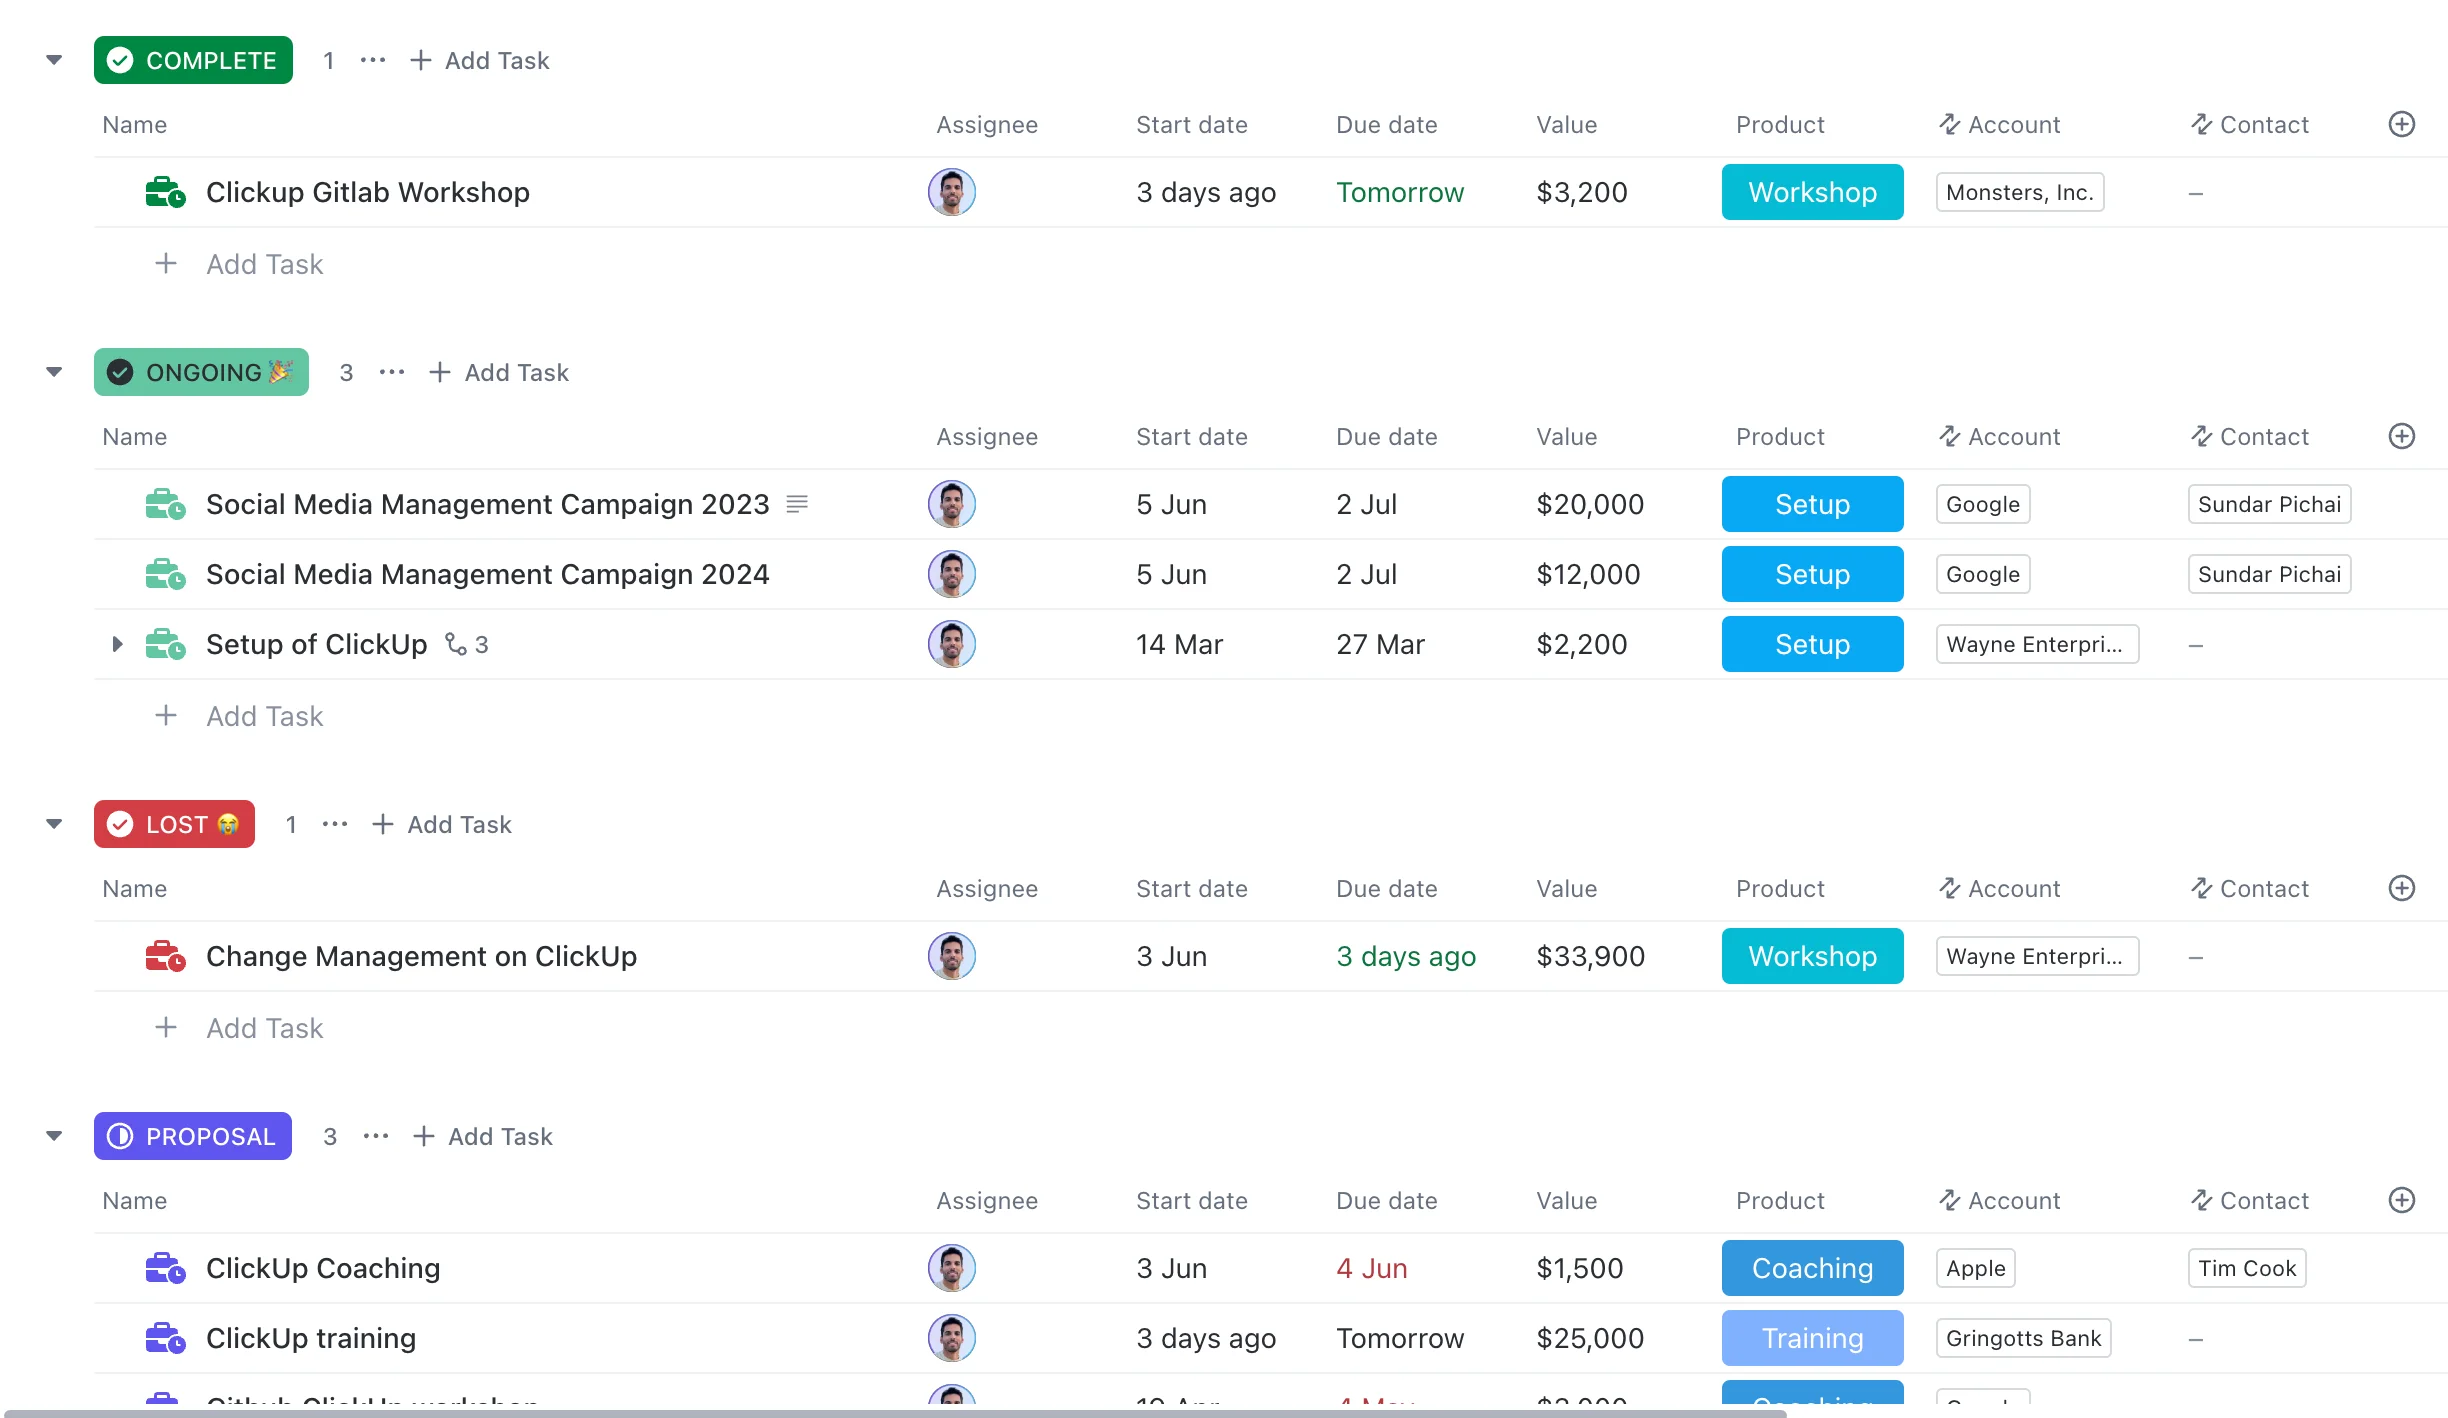
Step 3: Customize Your Deal Statuses
The Deals list represents your CRM system sales pipeline, where you'll spend most of your time. ClickUp's custom statuses let you define deal stages to match your agency's sales process.
Common deal stages:
- Lead In
- Discovery Call Scheduled
- Proposal Sent
- Contract Signed
- Project Kickoff
To customize your deal statuses:
- Open your Deals list.
- Click the three-dot menu in the top-right and select "Board view."
- Click "+ Add Status" to input your sales stages in order.
- Hover over each status, click the settings icon, and select "Manage statuses."
- Name each status, add emojis, and use the color picker for distinct colors.
- Click "Apply changes" when done.
Pro Tip: Limit statuses to 4-5 key stages to avoid overcomplicating your pipeline.
Automation ideas to streamline workflow:
- Automatically assign tasks when a deal enters "Proposal Sent."
- Send notifications when a deal moves to "Contract Signed."
- Update linked records when a deal is marked "Project Kickoff."
Step 4: Add Custom Fields
Custom fields help track key information on deals, accounts, and contacts, tailored to your agency's sales process.
Essential Custom Fields:
- Deal Value: Track the monetary value of each deal.
- Lead Source: Identify your most profitable lead channels.
- Industry: Segment deals by client industry for targeted reporting.
- Contact Name: Associate each deal with a primary contact.
- Phone Number: Keep client contact information readily available.
- Website: Quick access to client websites for research.
To create custom fields:
- Open any task in your Deals, Accounts, or Contacts list.
- In the right sidebar, select "Custom Fields" then "+ Field."
- Choose the appropriate field type (e.g., text, number, date, dropdown).
- Name your field and configure any necessary settings.
- Click "Create" to add the field to your list.
Choosing Custom Field Types:
- Text fields: For open-ended information like contact names or notes.
- Number fields: For quantitative data like deal values or phone numbers.
- Date fields: For tracking key milestones like close dates or last contact.
- Dropdown fields: For standardizing data entry with predefined options.
- Formula fields: To auto-calculate commissions, weighted values, or other metrics based on your custom field data.
Note: Check existing fields to avoid duplicates. Using custom fields transforms your ClickUp CRM into a robust database, providing valuable insights into your sales pipeline and client relationships.
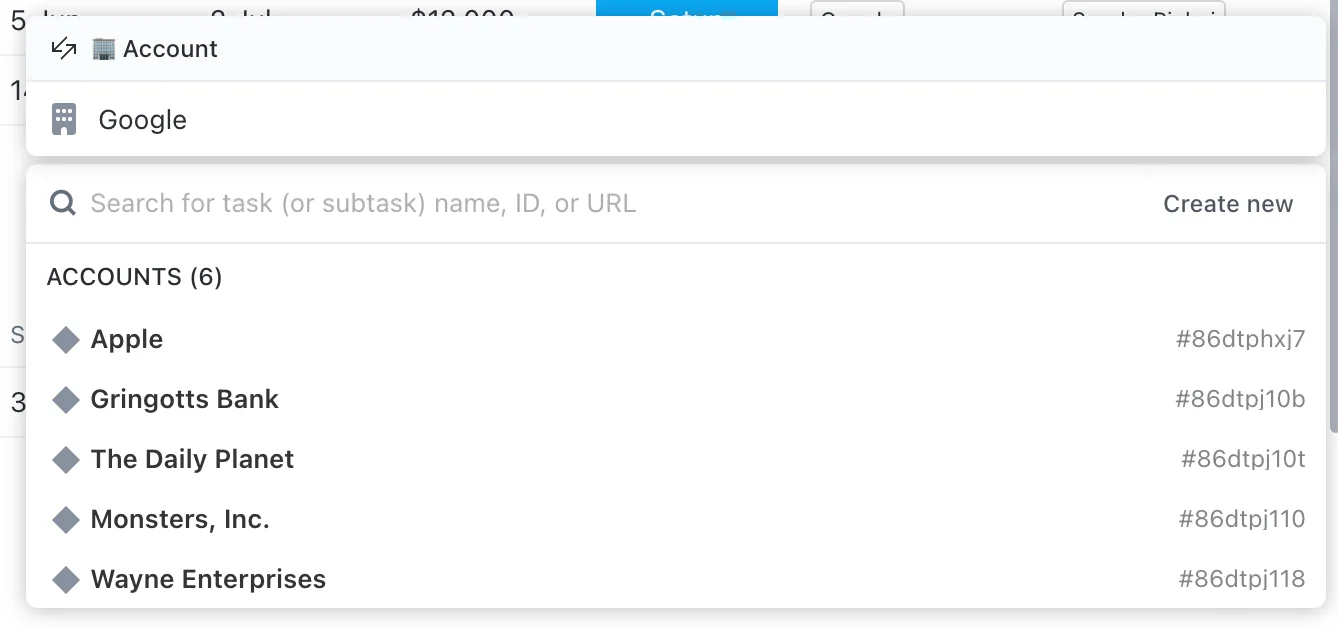
Step 5: Link Deals to Accounts & Contacts
To link deals to relevant companies and contacts, use ClickUp's Relationships custom field.
In your Deals list:
- Create a custom field called "Account"
- Select the "Relationship" field type and choose your Accounts list
- Repeat for a "Contact" field linked to your Contacts list
This setup allows you to view all deals associated with a particular client. You can also use rollup fields on the Account level, to sum up total deal values and quantities across all linked deals.
Well done! Next, build the views you need.
Step 6: Build your Views
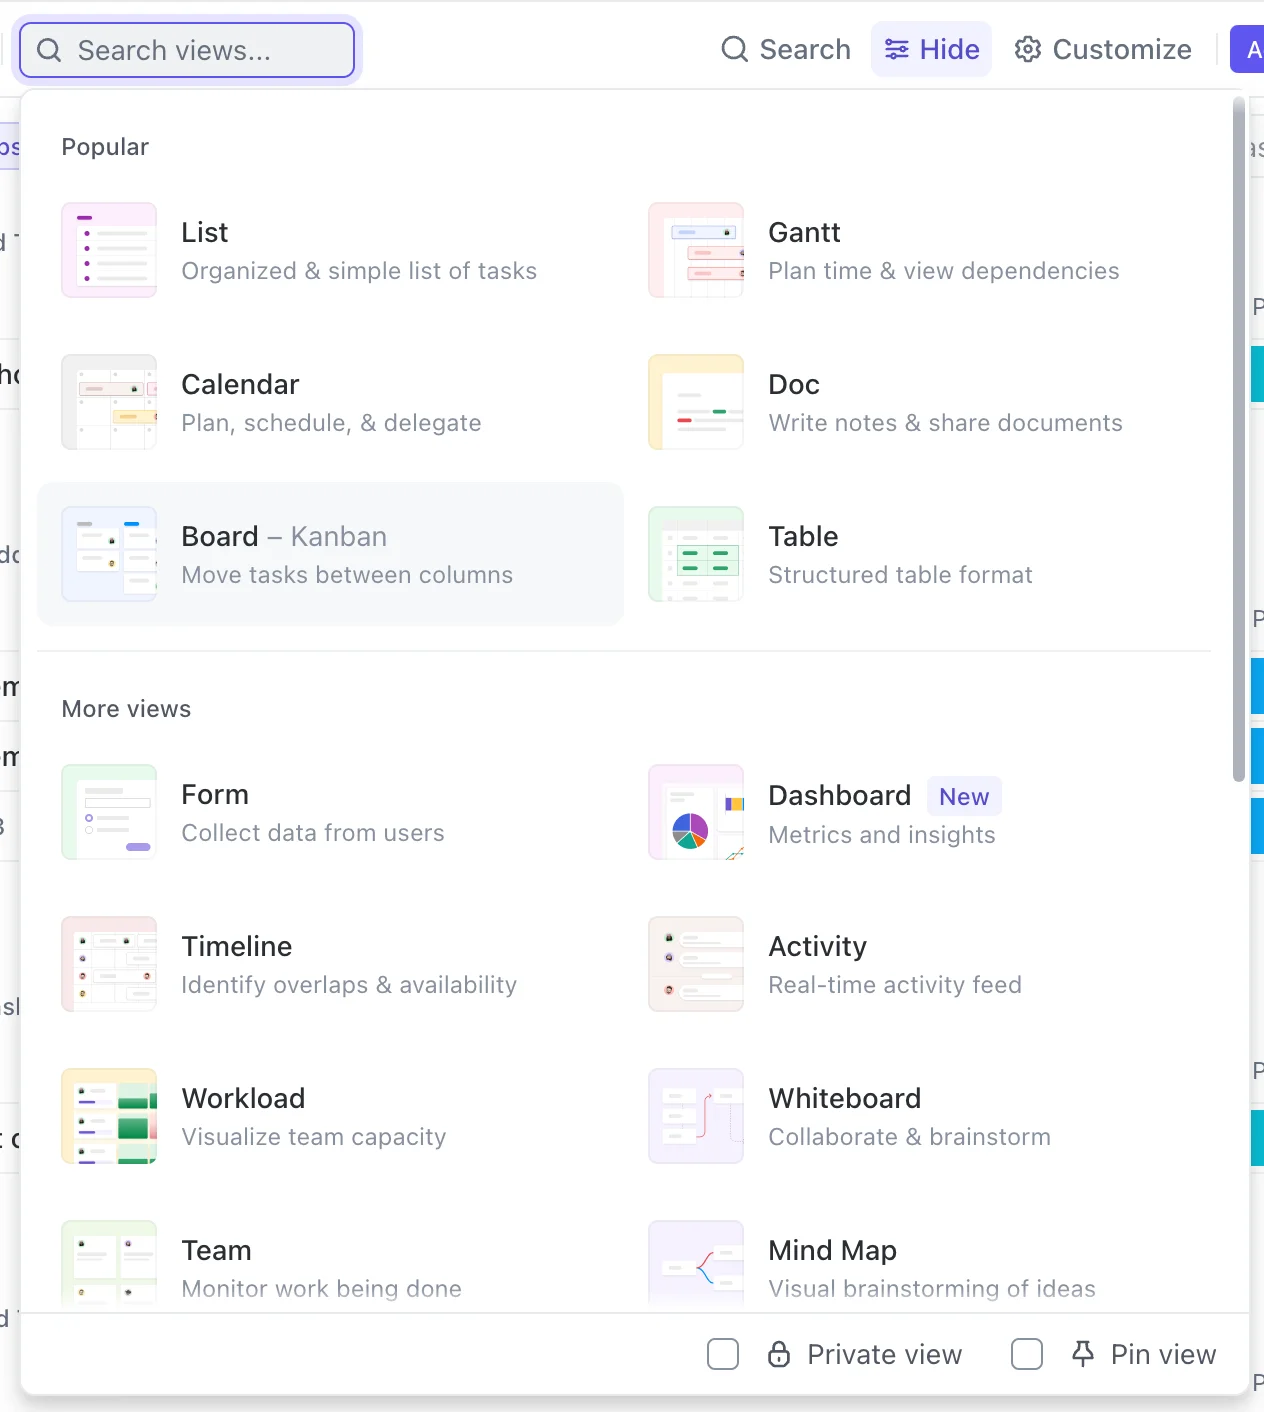
Views let you split your CRM data for easier analysis and management. Here are some must-have views for your Deals list:
- List View: See all deal details in a spreadsheet-style format. Customize columns to display key fields like deal value, close date, and assigned rep. Use this view for quick data entry and bulk editing
2. Board View: Visualize your sales pipeline by grouping deals into columns based on their stage. This provides a clear overview of each deal's status and helps identify bottlenecks.
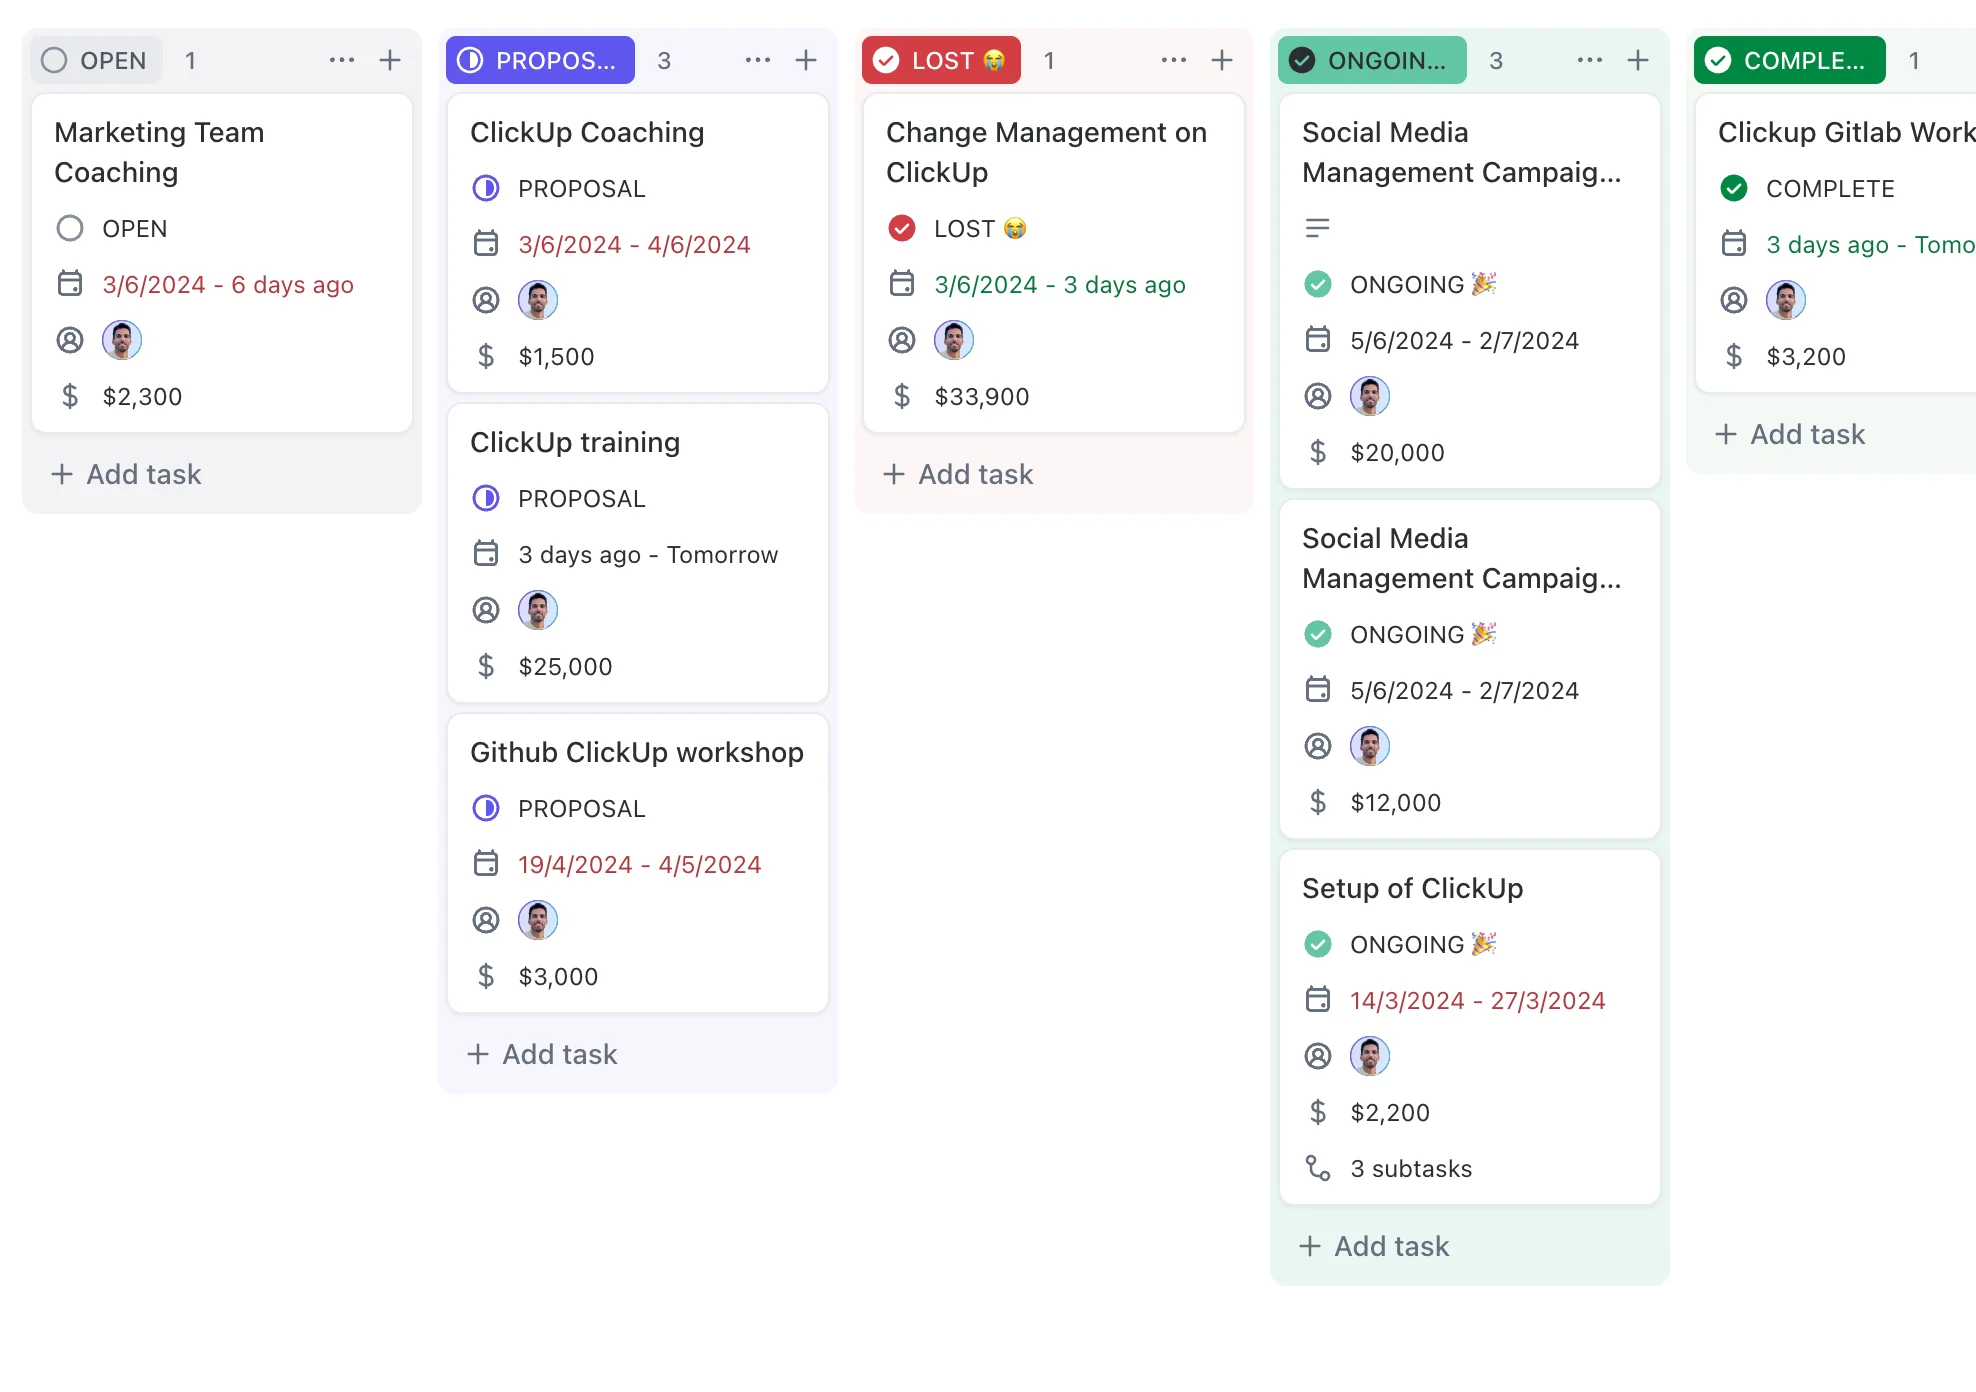
To create a Board View:
- Open your Deals list and click "+ View" in the top-left corner.
- Select "Board View."
- Configure grouping, filtering, and sorting settings:
- Group by fields like pipeline stage, deal owner, or account.
- Filter by criteria like deal value range or close date.
- Sort by attributes like value or priority.
- Save your view for easy future access.
3. Me Mode: Instantly filter tasks assigned to you, saving the need for manual filtering.
Customizing Views: Group, filter, and sort your views to show specific data, such as:
- Deals above $10K closing this month, grouped by salesperson and sorted by value.
Additional Views to Consider:
- Sales Leaderboard: Group deals by salesperson and sort by total deal value to gamify your pipeline and motivate your team.
- Deal Forecast: Create a Table view with calculated columns for expected revenue based on deal value and probability. Group by month to project future income.
- Stale Deals: Build a view filtered for deals that haven't been updated in a certain number of days. This helps identify neglected opportunities that may need attention.
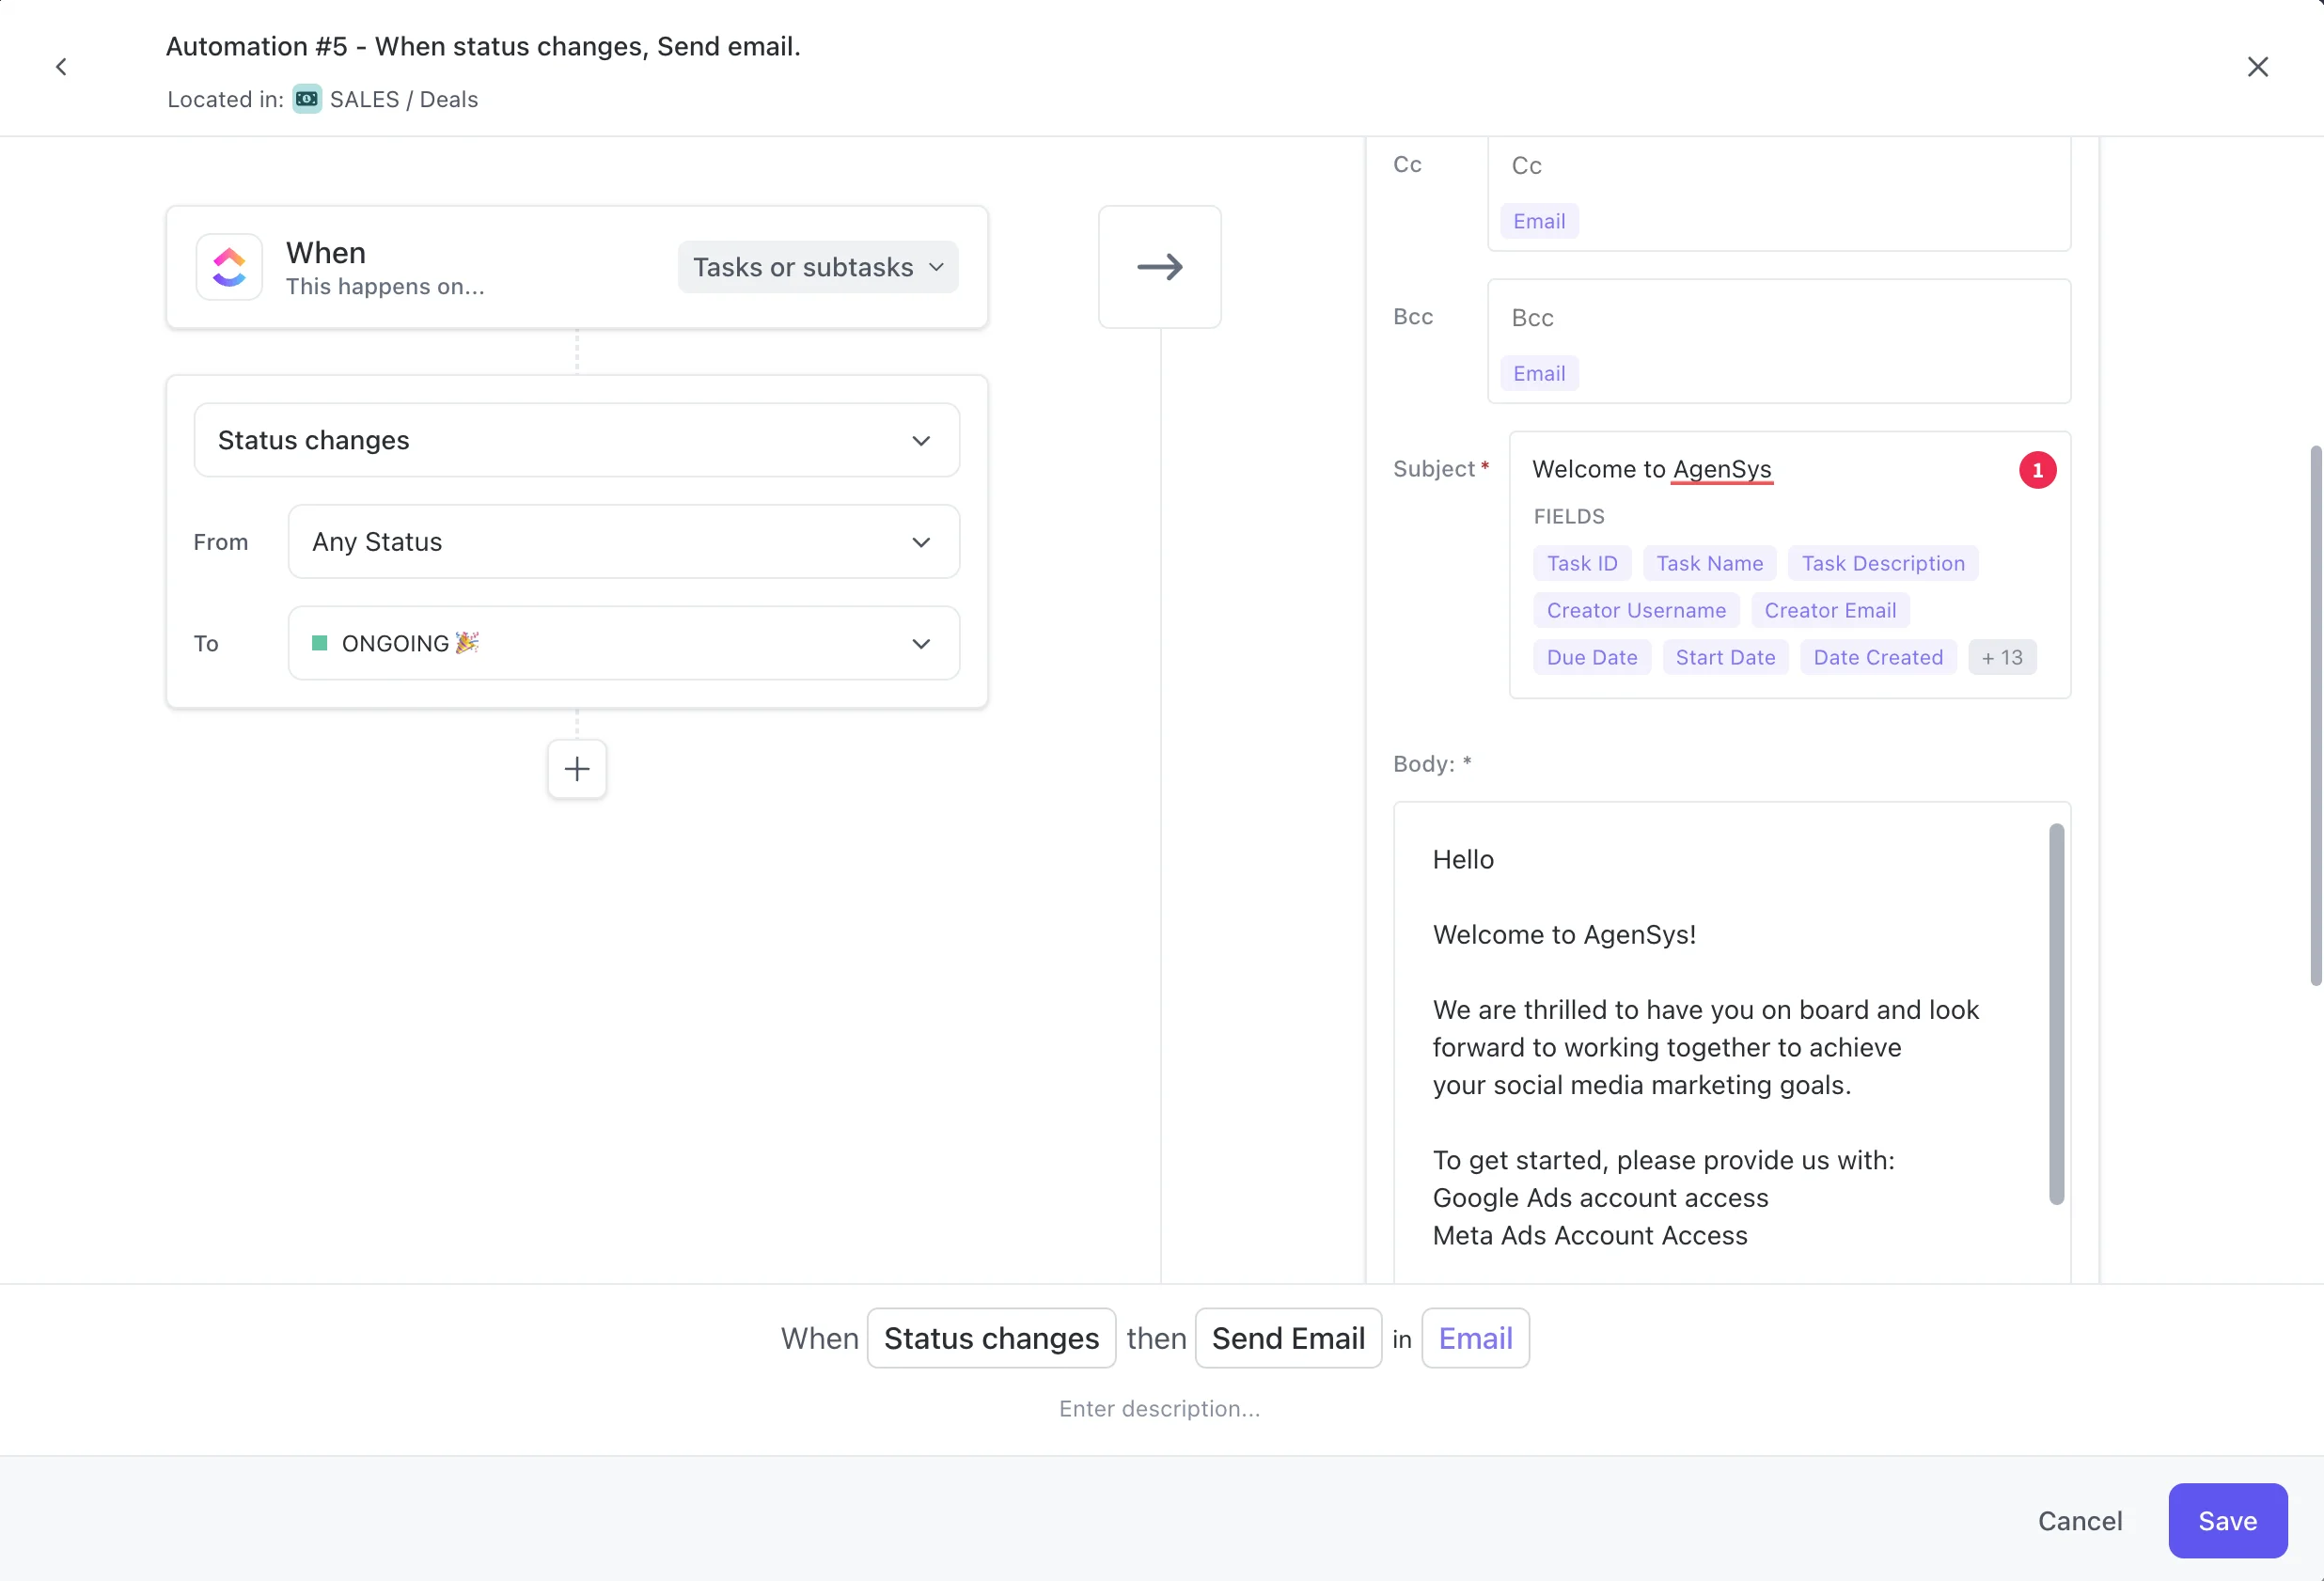
Step 7: Set Up Automations
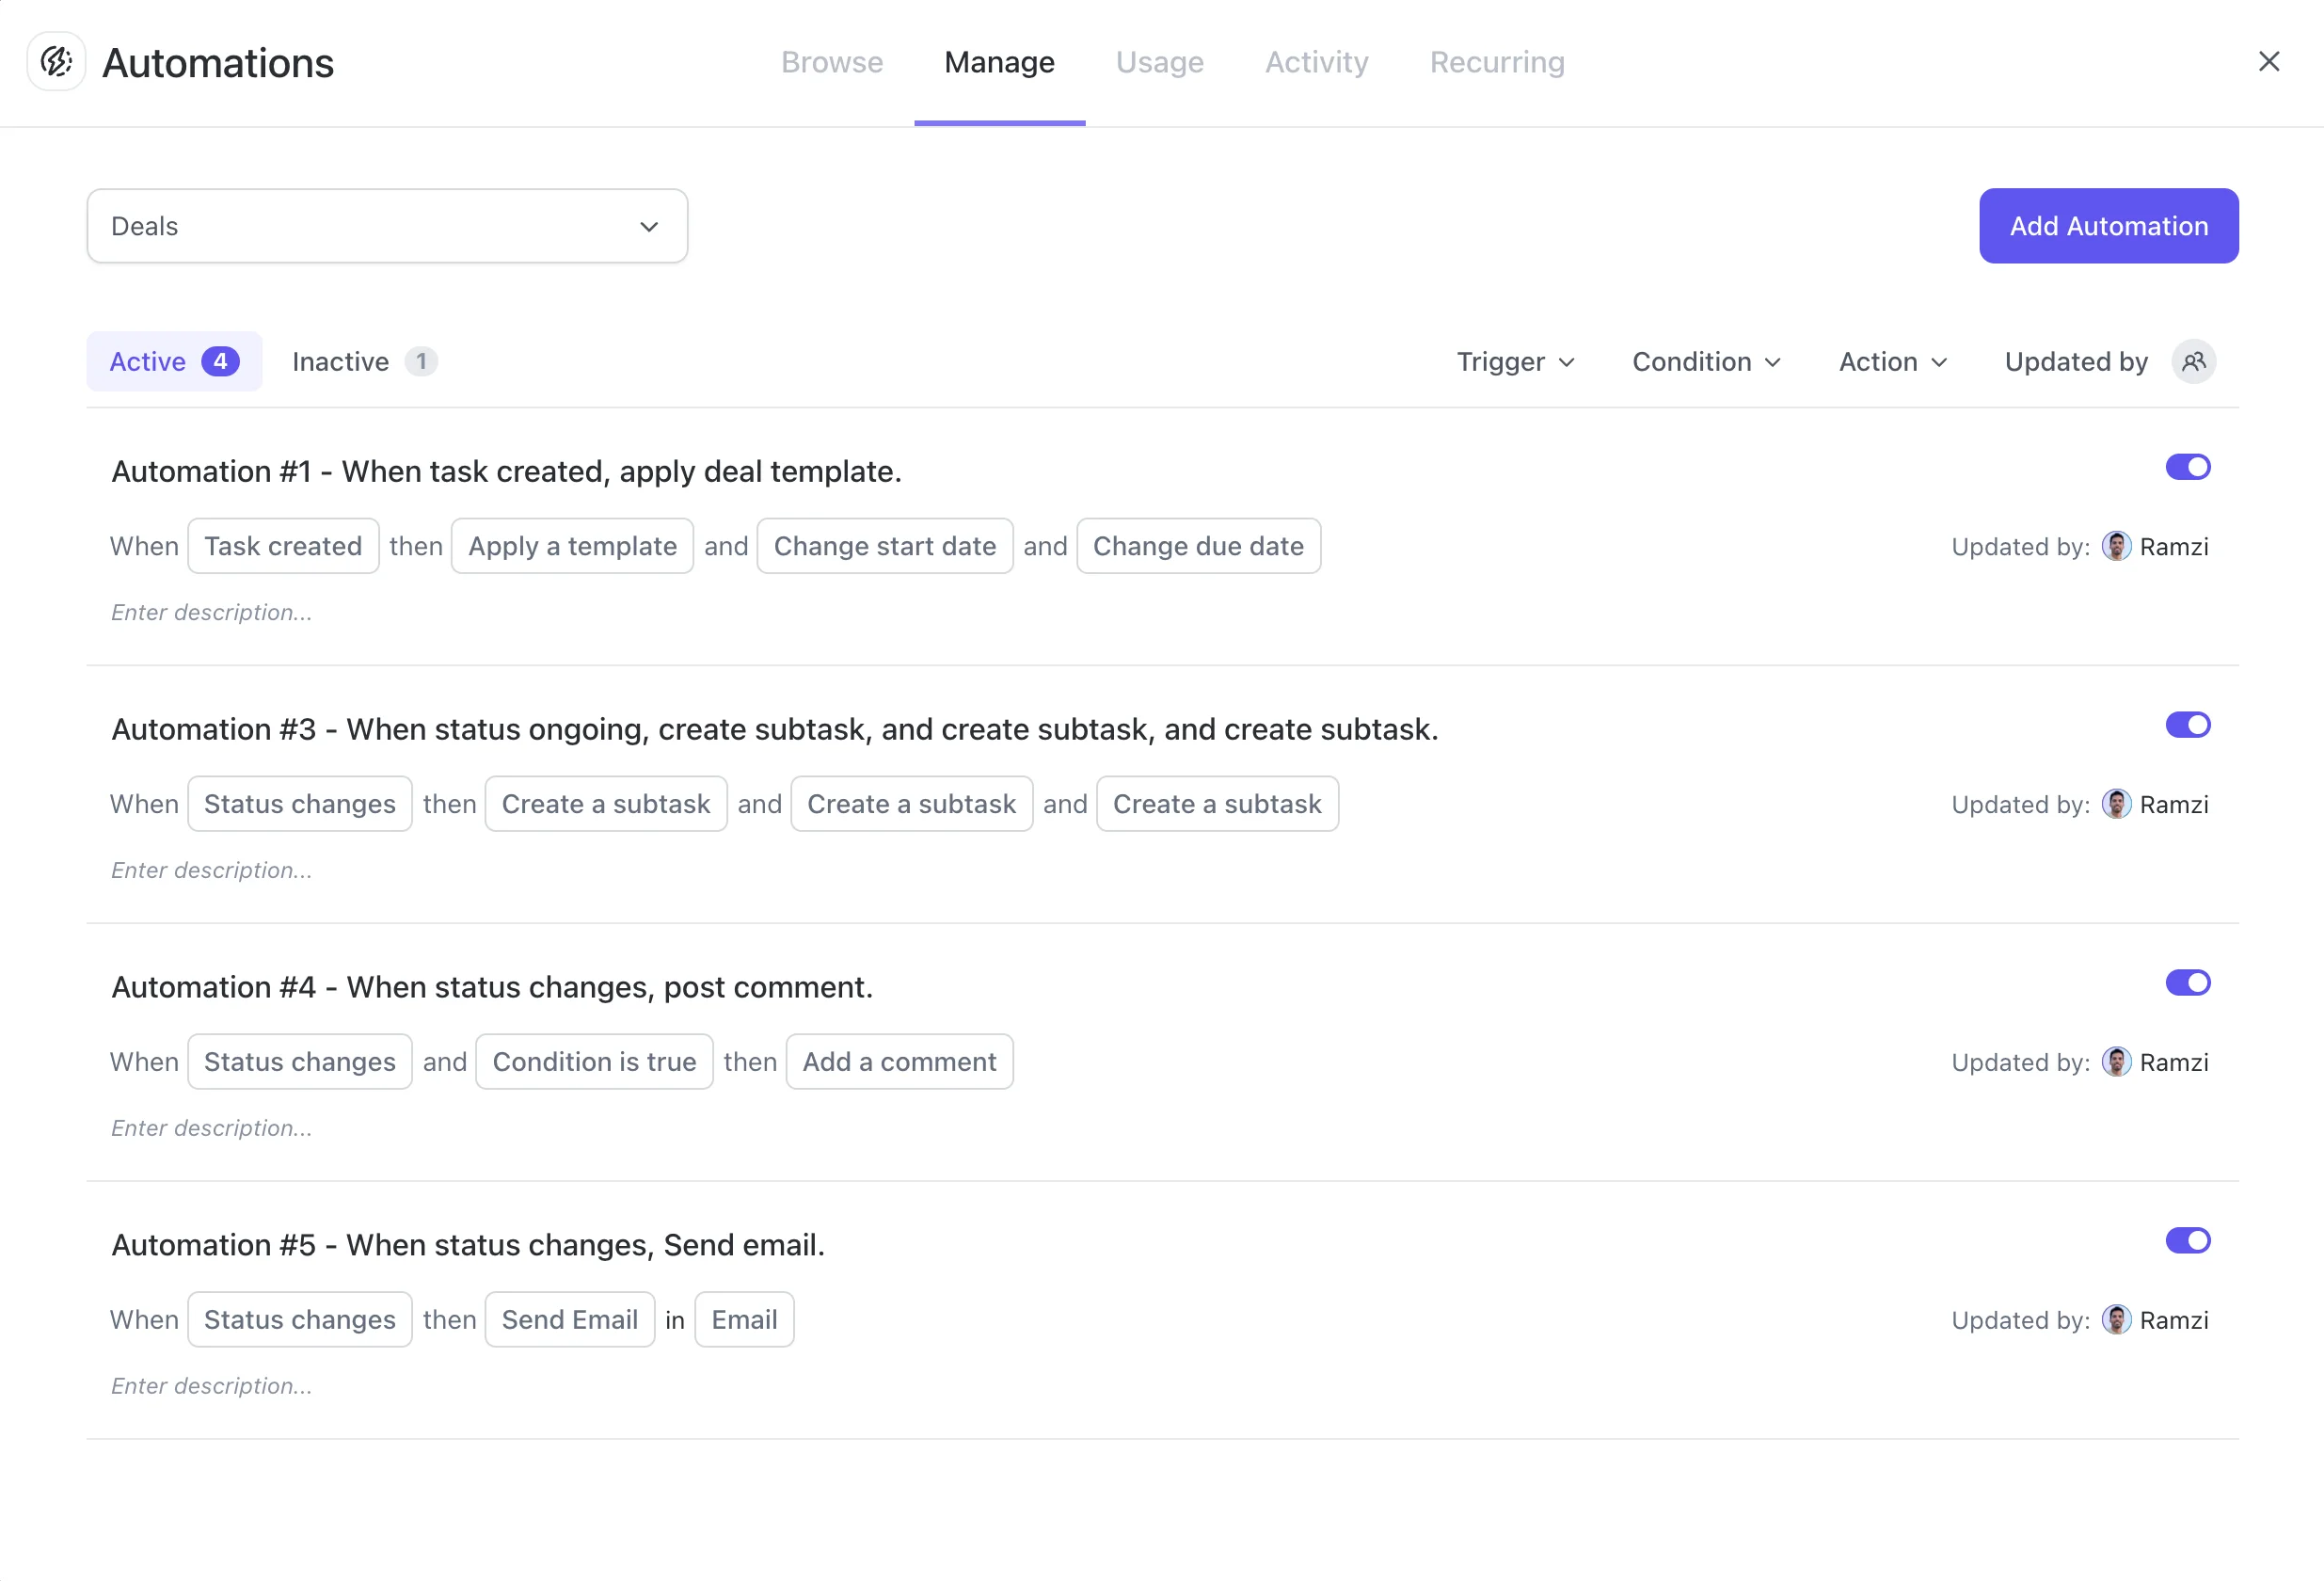
Automations can streamline your sales process by eliminating manual work.
To set up automations:
- Click your avatar in the bottom-left and select "Apps."
- Enable the "Automations" ClickApp.
- Open your Deals list and click "Automate" to start building workflow rules.
Automation Ideas:
- New Deal Automation: When a new deal is added, automatically assign tasks to gather key information like budget, timeline, and decision-makers.
- Proposal Sent Automation: When a deal stage changes to "Proposal Sent," trigger an automated email to the client with the next steps and additional resources.
- Deal Won Automation: When a deal is marked as won, create onboarding tasks for your delivery team, such as scheduling a kick-off call and gathering client assets.
Additional Automation Ideas:
- Stale Deal Alert: Notify the assigned rep if a deal hasn't been updated in a certain number of days.
- Task Creation: Automatically create tasks when a deal reaches a certain stage, like sending a contract or scheduling a meeting.
- Notifications: Notify key stakeholders when a deal's value or close date changes.
💡 Pro Tip: Use ClickUp's conditional logic to create more targeted automations, such as sending different email templates based on a deal's value or industry.
Automations save time and reduce errors, allowing your team to focus on building relationships and closing deals. Use them to handle repetitive administrative tasks, enhancing your sales process without replacing human interaction.
Operating Your ClickUp CRM
With your core CRM structure in place, it's time to put it to use. Here are some tips to get the most value from your new system:
Standardize Your Sales Process
A key benefit of a CRM is enforcing a consistent sales process. By creating a clear, step-by-step workflow, you ensure every prospect receives a high-quality experience.
To standardize your process in ClickUp:
- Document each stage of your sales cycle, from initial outreach to closed-won.
- Create task templates for common activities like discovery calls or proposal creation.
- Attach key resources like email scripts, demo decks, and contract templates to these templates.
- Use ClickUp's Automations to assign tasks and resources when a deal reaches a certain stage.
- Create an internal wiki or resource center in ClickUp Docs for your sales playbook, FAQs, and best practices.
- Link this hub directly from your deal templates for easy reference.
This ensures new reps can follow a predefined process without relying on assumptions.
Track Client Health
Your CRM is a powerful tool for managing ongoing client relationships. Regularly monitor account health and health scores to identify and address potential issues early. Use ClickUp's comment section on Account records for weekly status updates, noting:
- Client's overall happiness level (Green/Yellow/Red)
- Changes to project scope or timeline
- Potential roadblocks or risks
- Additional resources or support needed
Create a saved view in your Accounts list filtered for comments added in the last 7 days. Review this view in your weekly team meeting to identify at-risk accounts and spot opportunities. Accounts with consistent "Green" statuses are ideal for upsells, cross-sells, and referrals.
To do this in ClickUp:
- Create a recurring task on each Account for the owner to add a weekly status comment.
- Set up Automations to notify account managers or executives if an account's status turns "Red."
- Use ClickUp's Priorities to flag high-value upsell or referral opportunities.
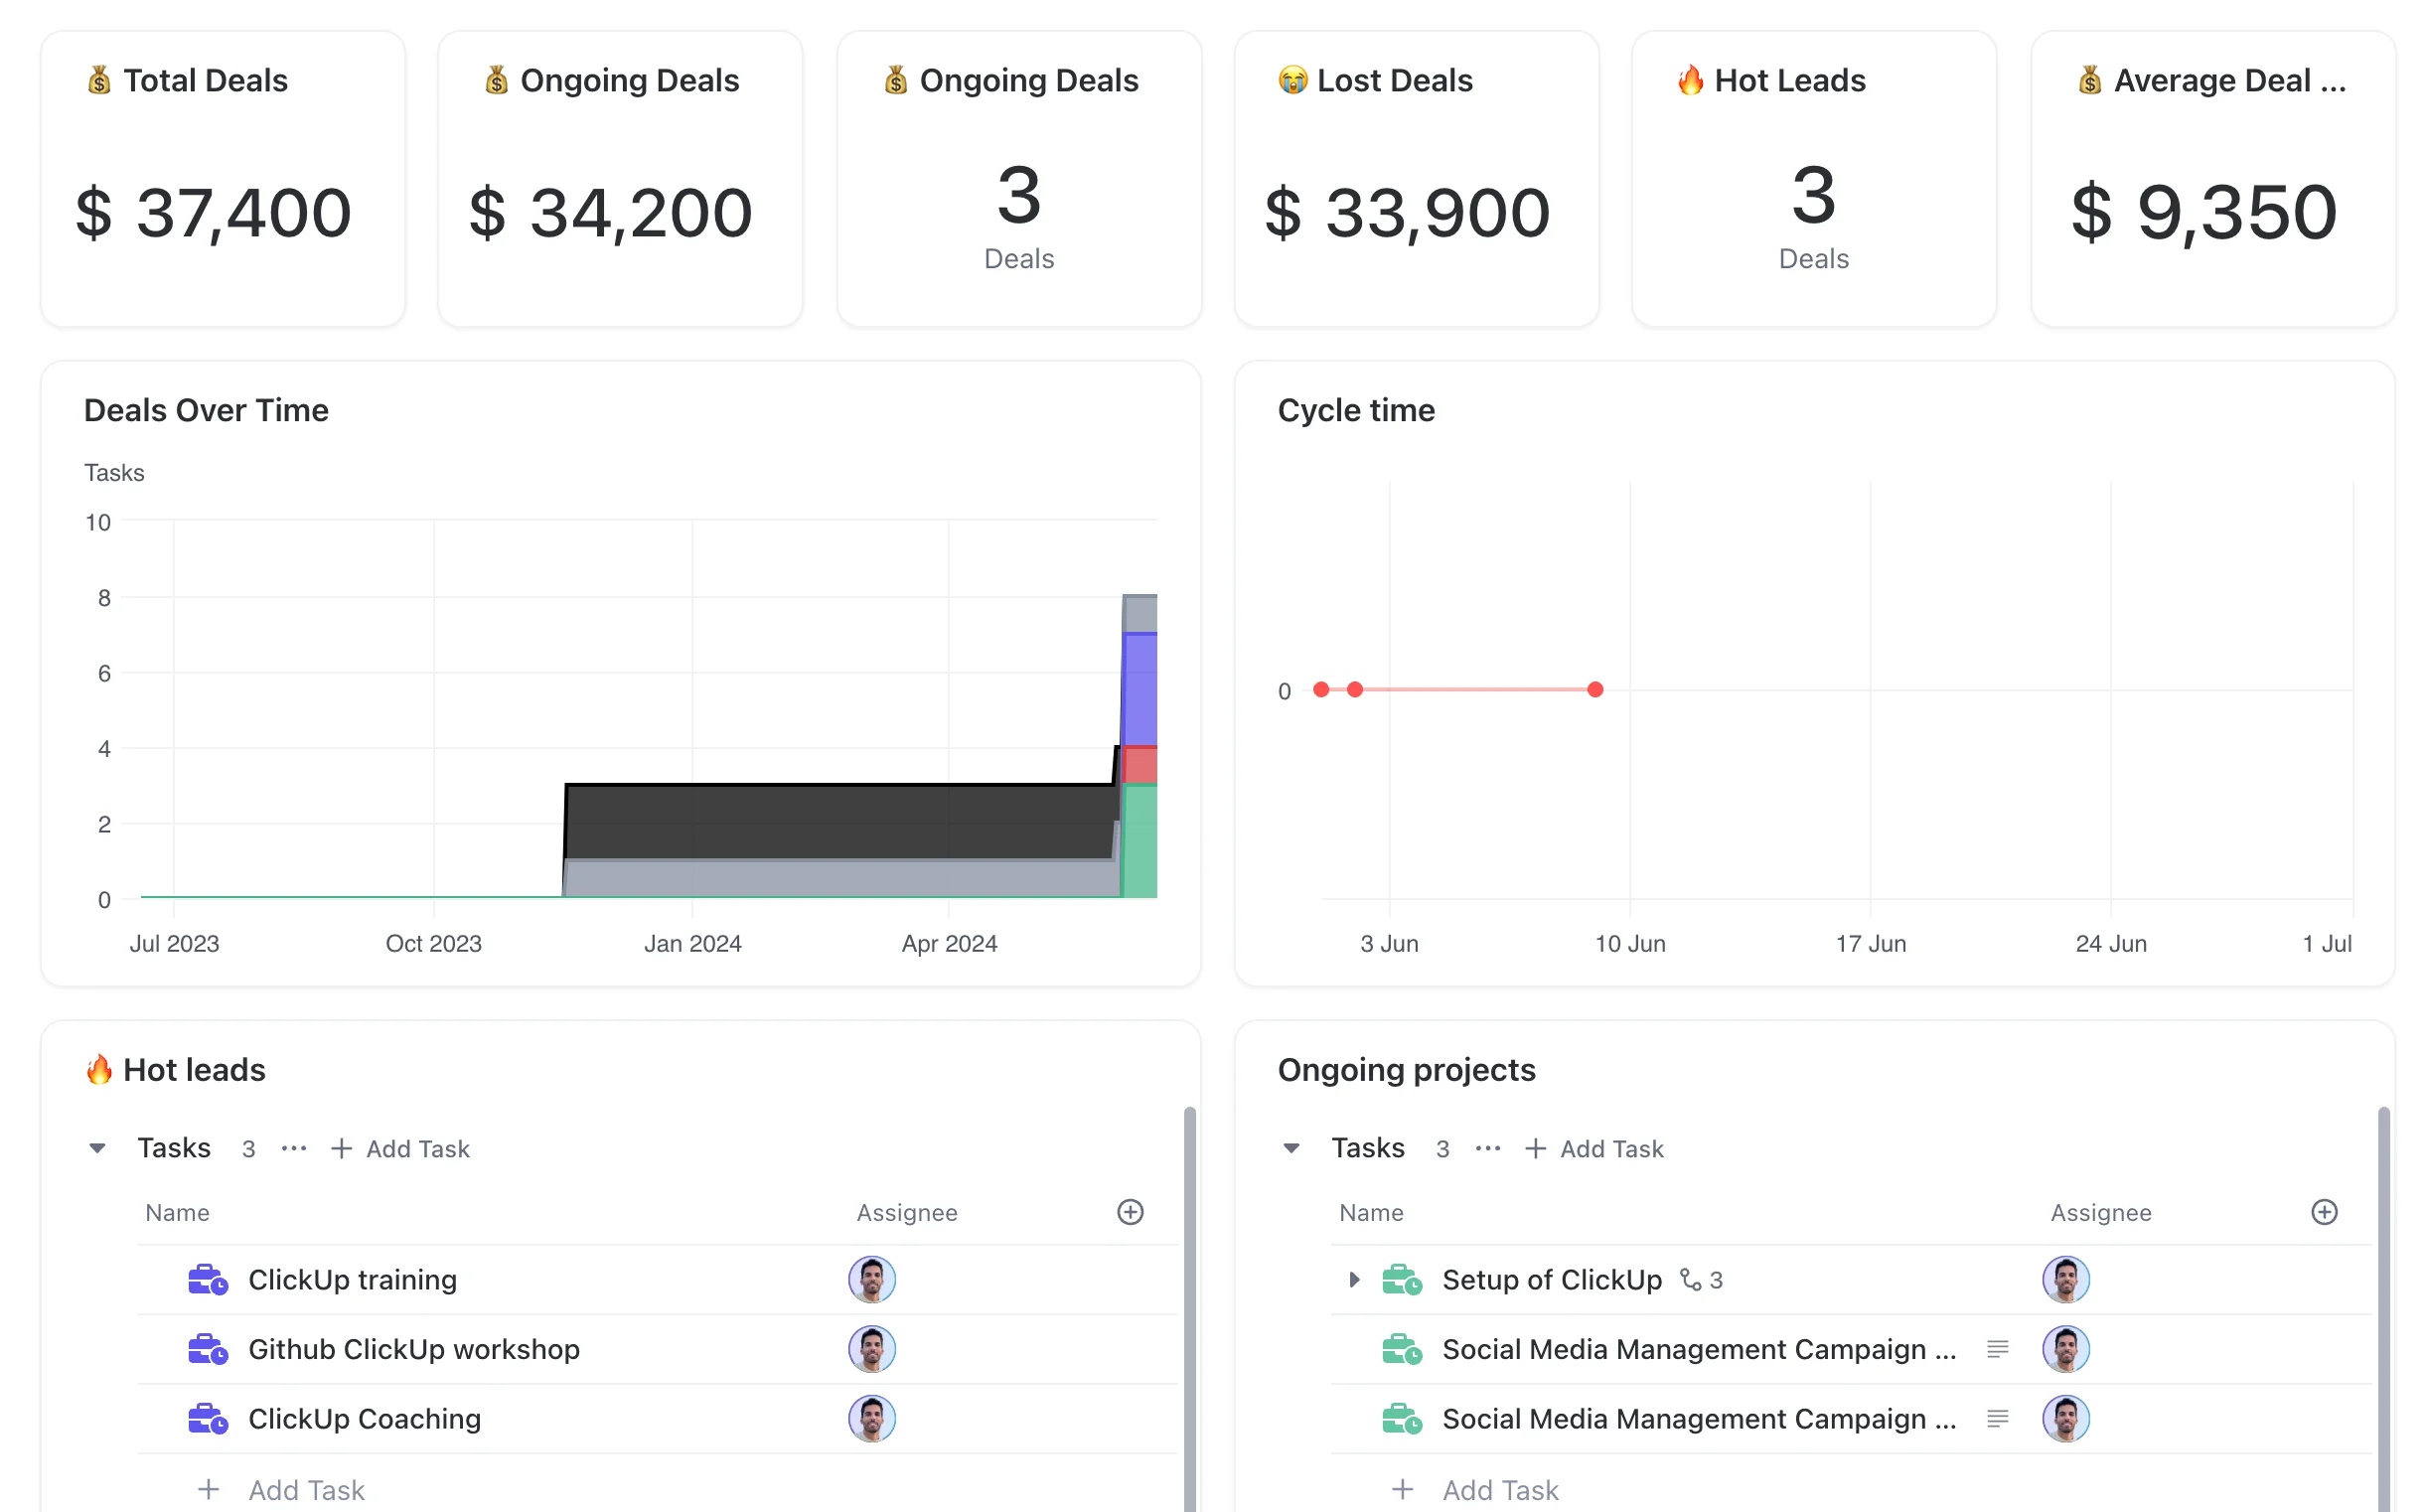
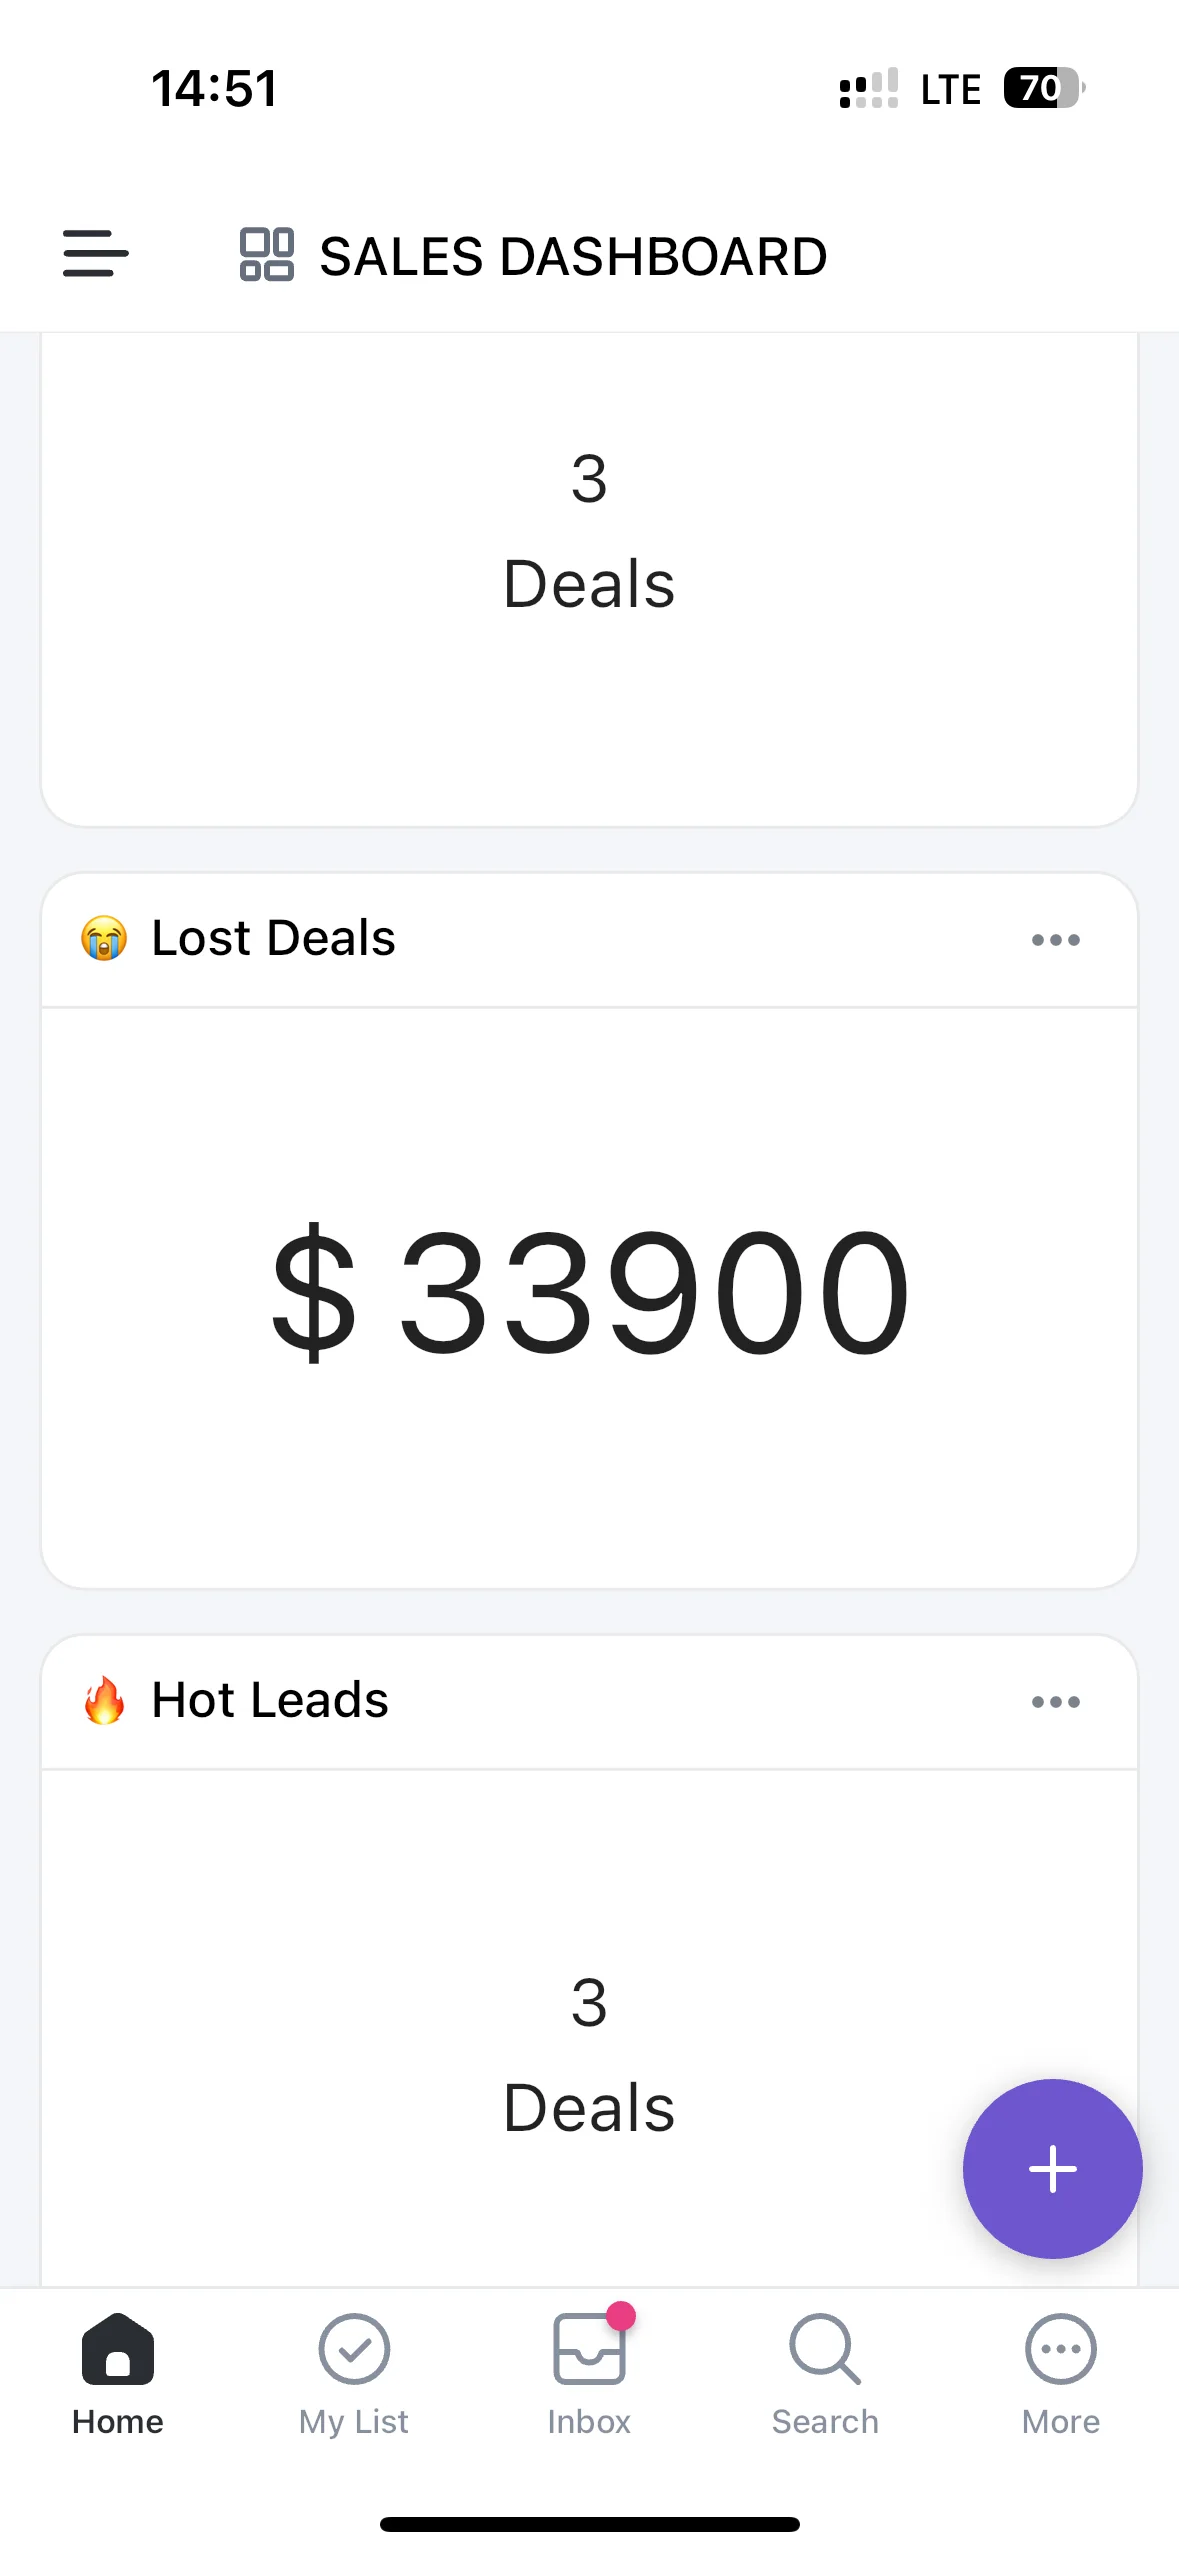
Build a Sales Dashboard
To make data-driven decisions, you need real-time visibility into your pipeline and performance. ClickUp's Dashboard feature allows you to build customized reporting panels to track your key sales metrics.
Some essential widgets to include:
- Deal Forecast: Sum of expected revenue from all open deals, grouped by close date
- Pipeline Velocity: Average time for a deal to move from stage to stage
- Rep Leaderboard: Ranking of reps by closed-won revenue or deal volume
- Deal Funnel: Breakdown of deal count and value by stage
Create separate dashboards tailored to different audiences. A sales manager may need a comprehensive view of team performance, while an executive might only want top-line revenue and growth metrics. Customizing ensures everyone gets the most relevant data for their role.

Some other powerful dashboard examples:
- Sales Leaderboard: Motivate friendly competition by ranking reps based on revenue or deals closed
- Win/Loss Analysis: Understand why deals are won or lost by tracking reasons in custom fields, then visualizing in a pie chart widget
Activity Metrics: Monitor key sales activities like calls, emails, and meetings in a bar chart widget to ensure reps are staying productive
The most impactful dashboards are the ones that get used regularly. So design with your end users in mind, keep it simple, and make reviewing dashboards a consistent habit. With the right mix of metrics, visualizations, and customization, your ClickUp CRM dashboard will become an indispensable tool for driving sales success
A few more tips to supercharge your ClickUp CRM
Tip #1: Add an Internal Sales Knowledge base as a view in your sales space
Now that you've built your dynamic sales wiki, integrate it seamlessly into your ClickUp CRM. A single, central source of truth in ClickUp Docs allows your sales team to quickly access the information they need. Here's how:
- Create a new view in your Sales Space dedicated to your sales wiki.
- Document all your sales processes.
- Link each doc to relevant deals, accounts, or contact task templates.
- Set permissions to ensure information is accessible only to the right people.
Tip#2: Integrate with Other Tools
While ClickUp can handle the core functions of a CRM, chances are you use other tools in your sales process as well. Some common integrations for sales teams:
- Meeting Scheduling (Calendly, Cal.com): Sync booked appointments from your scheduling tool to your ClickUp tasks
- Calendar (Google Calendar, Outlook): Sync meetings and appointments to your ClickUp tasks
- E-Signature (DocuSign, HelloSign): Update deal stages in ClickUp when a contract is signed
- Communication (Gmail, Slack): Send and receive ClickUp notifications in your team chat or inbox
- Prospecting (LinkedIn Sales Navigator, ZoomInfo): Enrich your account and contact data with third-party info
- Proposals (PandaDoc, Proposify): Attach proposal documents and track signing status on your deals
- Web Forms (Typeform, Google Forms): Automatically create new leads in ClickUp when a prospect submits a form on your website
Use ClickUp's native integration with Make.com to connect to even more apps. Make acts as a bridge between ClickUp and 3,000+ other tools.
When evaluating integrations, consider:
- Data Sync: What information needs to be shared between systems? Ensure your integration keeps key fields like contact details, deal stages, and activity history in sync.
- Trigger Events: What actions in one system should prompt updates in another? For example, creating a new contact in your CRM could trigger a new subscriber in your email marketing tool.
- Bidirectional Sync: Do you need data to flow both ways between systems? Bidirectional sync keeps information consistent across your stack but may require more setup.
Remember, the goal of integrations is to simplify your workflow, not complicate it. Start with a few key integrations and gradually add more as needed. Powerful Integration Ideas
Tip #3: Use your CRM on the go with the ClickUp Mobile App
ClickUp Mobile provides on-the-go access to all your key CRM features:
- View, create, and update deals and tasks
- Manage pipeline stages and deal statuses
- Access sales collateral, proposals, and contracts
- Monitor key metrics and performance
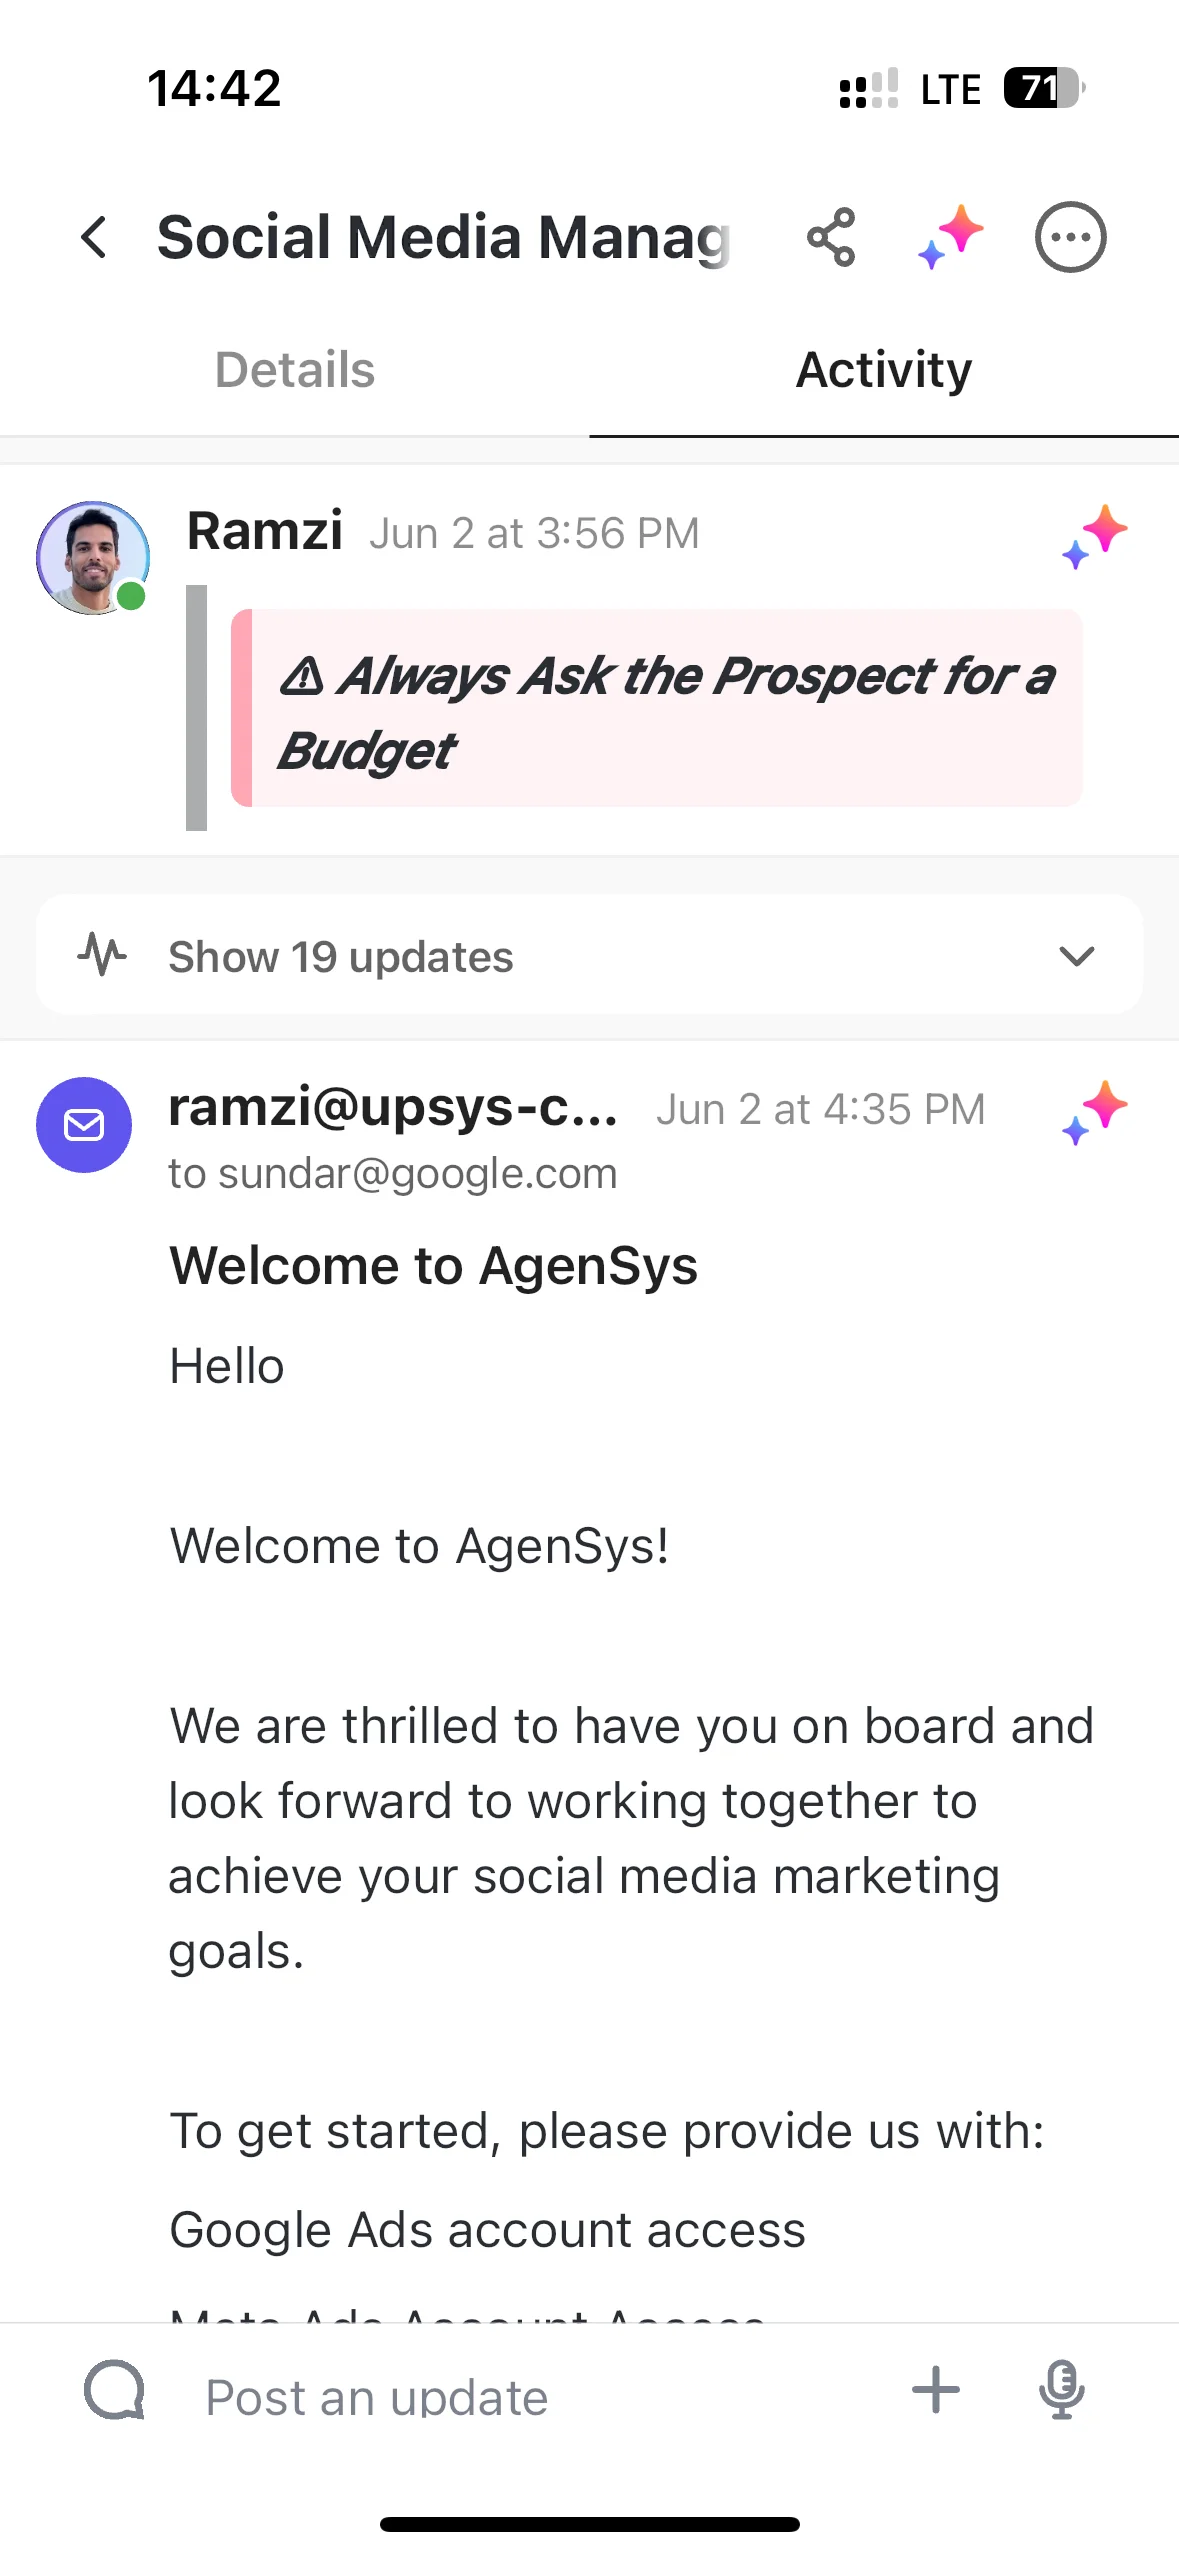
For reps who are often out of the office, ClickUp Mobile is a game-changer. They can log meeting notes, update deal stages, and assign follow-ups right from their phone, ensuring the whole team is always up-to-date. Whether you're prepping for a client meeting or logging a call note between appointments, ClickUp Mobile keeps you connected to your deals.
Conclusion
With the tips and structure provided in this guide, you'll be on your way to sales success. Building a CRM in ClickUp is a game-changer for agencies, streamlining your sales process and saving time and energy by consolidating deal tracking, client info, and team collaboration in one place.
Training your sales team to use this tool effectively is crucial for seamless functionality. If you've set up your CRM in ClickUp, congratulations! To take your usage to the next level, consider:
- Integrating your favorite applications
- Facilitating remote access through the mobile app
- Automating tasks to save time and reduce errors
- Building a dynamic internal wiki for your sales team
- Capitalizing on intuitive reports for valuable insights
While ClickUp may not be as robust as a dedicated CRM, it offers sufficient features for most agencies at a much more affordable price. Additionally, integrating your sales data with your project work boosts efficiency.
At UpSys, we can help you build your agency's sales pipeline. Book a discovery call if you're interested.
Got a project with ClickUp?
Book a call Now 🗓️Supercharge your business today


