Key Takeaways:
- Automatically archiving tasks in ClickUp can help declutter your workspace
- Use Make.com (formerly Integromat) to create automations for task archiving
- Two automations are needed: one to store task info and another to archive after 30 days
- The process involves using webhooks, data storage, and conditional logic
- This method can automate archiving timeframes (e.g., 60 or 90 days)
How can you automatically archive tasks in ClickUp after they've been closed for a while?
Use Make.com to create two automations. The first one saves information about closed tasks. The second one checks this information daily and archives tasks that have been closed for more than 30 days.
Introduction
If you're using ClickUp, you might have noticed that your lists can get pretty messy with old, completed tasks. Even though ClickUp doesn't have this feature built-in, we can make it happen using a tool called Make.com (it used to be called Integromat).
In this guide, we'll walk you through how to set up an automation that will archive your ClickUp tasks 30 days after they're marked as done. This will help keep your workspace clean and make it easier to focus on what's important.
Video Tutorial: Setting Up Automatic Task Archiving in ClickUp
Auto Archive Tasks in ClickUp like a Pro!
Understanding Webhooks
Webhooks play an important role in this automation, so it's worth explaining them in more detail:
What are Webhooks?
Webhooks are like automatic messengers for the internet. When something happens in one app (like a task being closed in ClickUp), the webhook sends a message to another app (in this case, Make.com). It's a way for different apps to talk to each other in real-time.
Why Use Webhooks?
Webhooks allow for immediate action. As soon as a task is closed in ClickUp, Make.com receives a notification and knows about it. This is much faster and more efficient than having Make.com constantly check ClickUp for changes.
Make.com vs. Other Automation Tools
While this guide focuses on Make.com, it's worth noting that there are other automation tools available:
- Zapier: Another popular choice for creating workflows between apps.
- IFTTT: Good for simple automations, especially for personal use.
- ClickUp's Native Automations: While they don't offer this specific feature, ClickUp does have some built-in automation capabilities.
Make.com (formerly Integromat) is often preferred for more complex automations due to its visual workflow builder and powerful features. However, the choice of tool may depend on your specific needs and budget.
Why Automatic Task Archiving Matters
Auto-archiving is a feature that automatically moves tasks to an archive after they have been marked as completed for a specified period. This function is crucial for keeping your task list manageable and your workspace clean.
Before we look into the technical details, let's consider why this automation is so valuable
1. Improved Focus: By removing completed tasks from view, you can concentrate on current and upcoming work.
2. Reduced Clutter: Prevent your lists from becoming overwhelmed with completed tasks.
3. Easier Navigation: Find active tasks more quickly without sifting through completed ones.
4. Maintained History: Archived tasks are still accessible and you can show archived items if needed, without cluttering your daily view.
Now, let's get into how to set this up!
Setting Up the Automation: A Two-Part Process
We're going to create two separate automations in Make.com:
- The "Task Done" Automation: This one runs whenever a task is closed in ClickUp. It saves the task's ID and the date it was closed.
- The "Archive Old Tasks" Automation: This one runs every day, managing multiple tasks that meet the criteria. It looks at the saved task information and archives any tasks that have been closed for more than 30 days.
Let's break these down step by step.
Part 1: Saving Information When a Task is Closed
In ClickUp:
- Go to your ClickUp workspace.
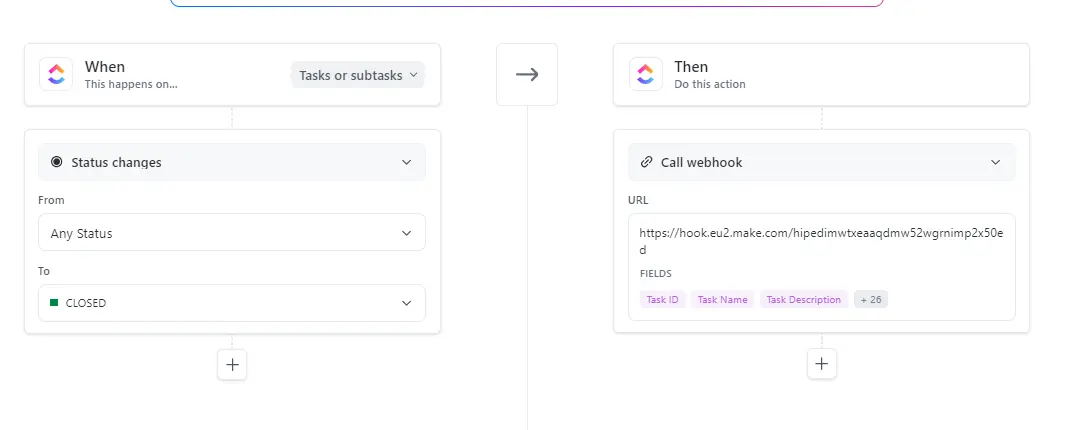
- Click on "Automations" and then "Add Automation."
- Set it up so that when a task's status changes to "Closed," it triggers a webhook.
- You'll need to paste a special URL from Make.com here (we'll get that in a minute).
In Make.com:
- Create a new scenario.
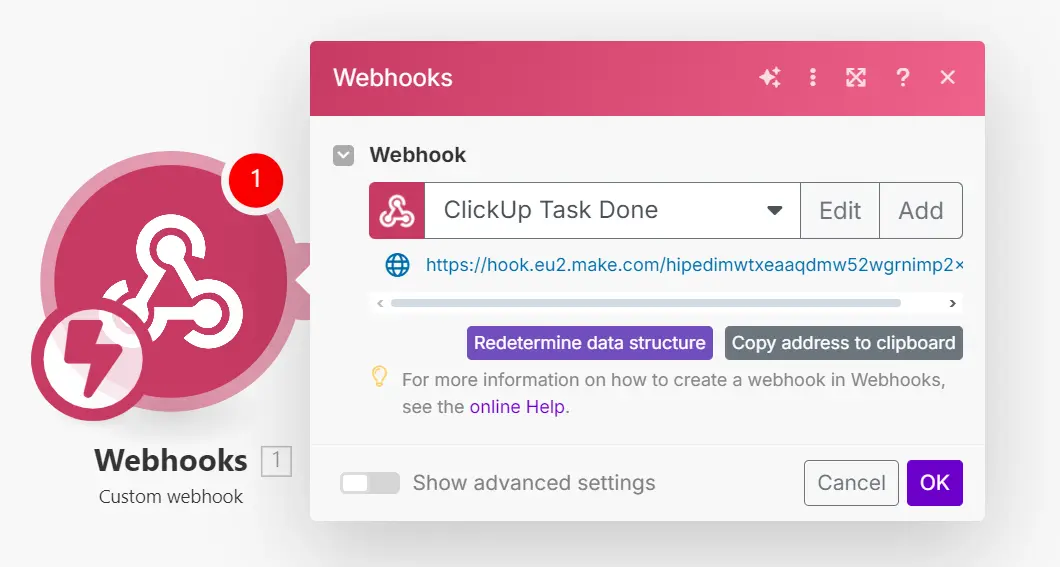
- Choose "Webhooks" as your trigger.
- Pick "Custom Webhook" and give it a name like "ClickUp Task Done."
- Make.com will give you a URL. Copy this and paste it into your ClickUp automation.
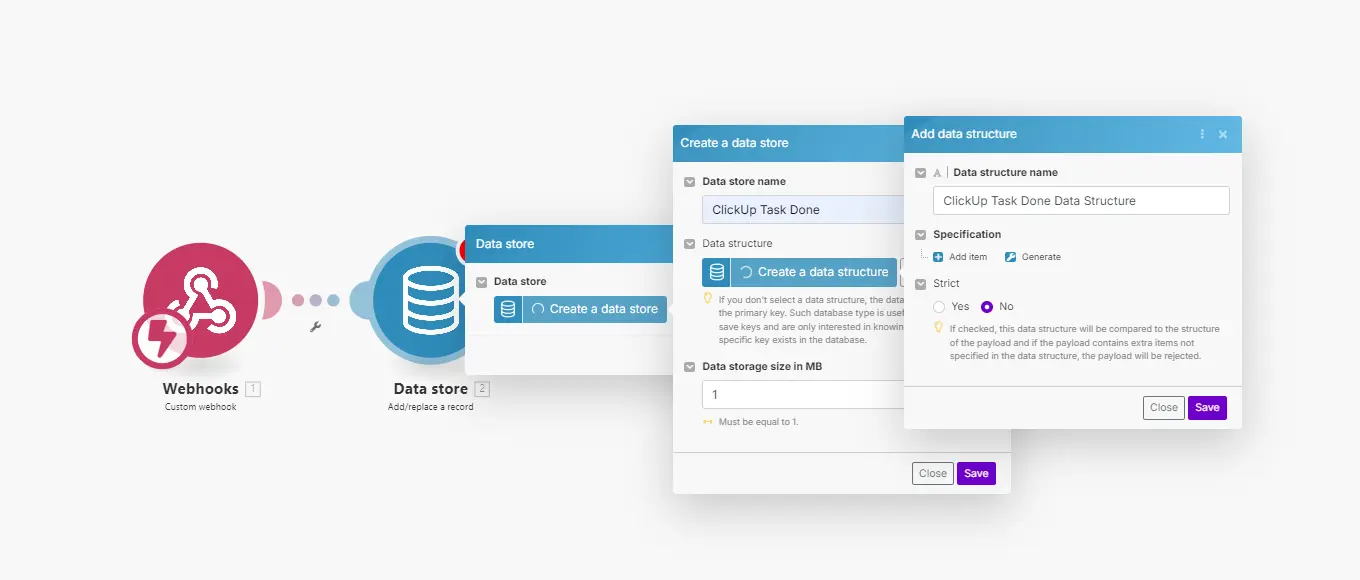
5. Add a "Data Store" module after the webhook.
6. Create a new data store called "ClickUp Task Done."
7. In this data store, make two fields: "ID" for the task ID, and "close_date" for when it was closed.
8. Connect the information from the webhook to these fields.
Part 2: Checking and Archiving Old Tasks
In Make.com:
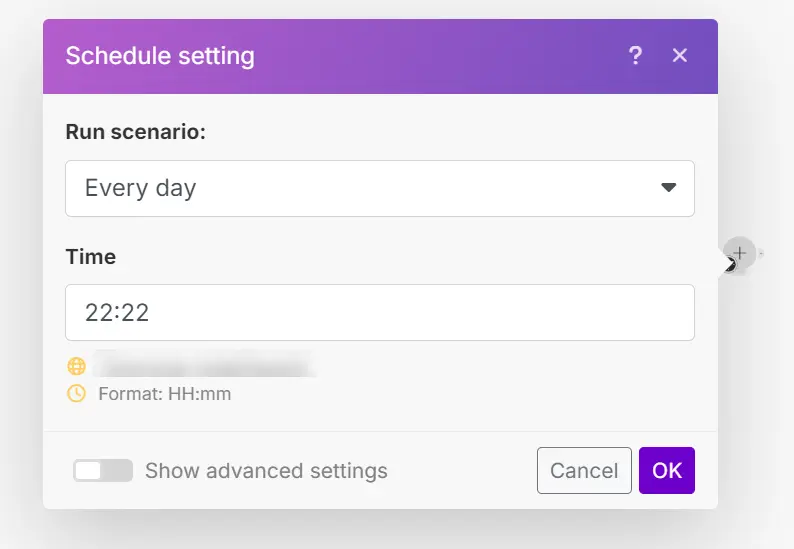
- Create another new scenario.
- Set this one to run every day at a specific time (like 10:22 PM).
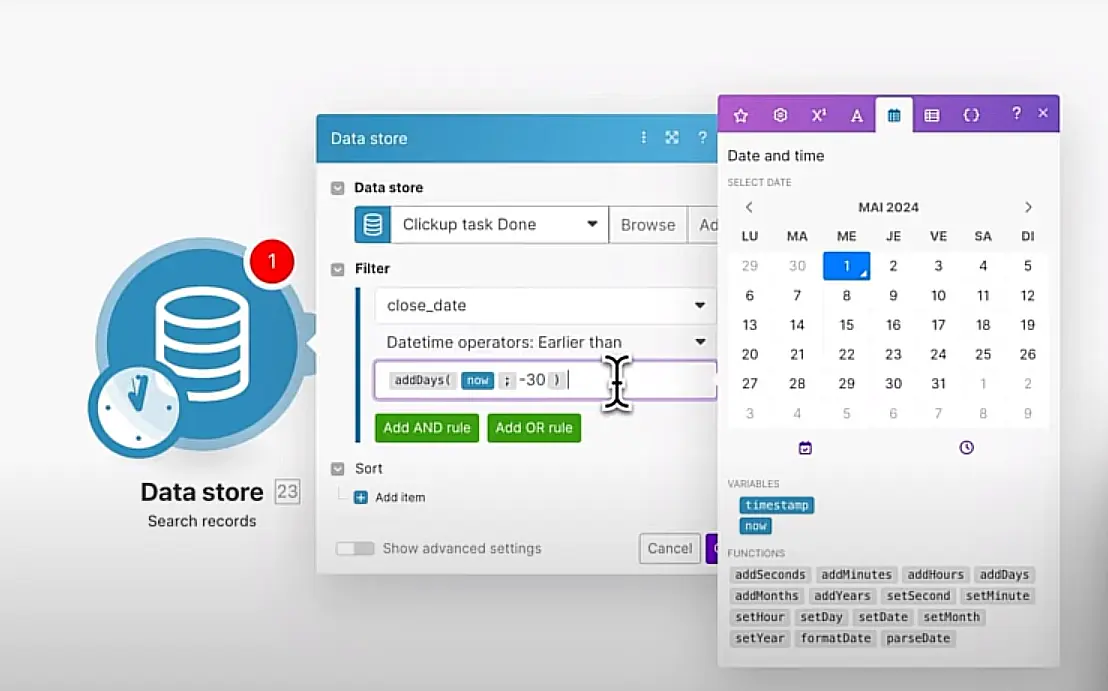
3. Add a "Data Store" module set to "Search Records."
4. Set up a filter to find tasks closed more than 30 days ago. The filter will look something like this:
Copy{close_date} < {{add(now; -30; "days")}}
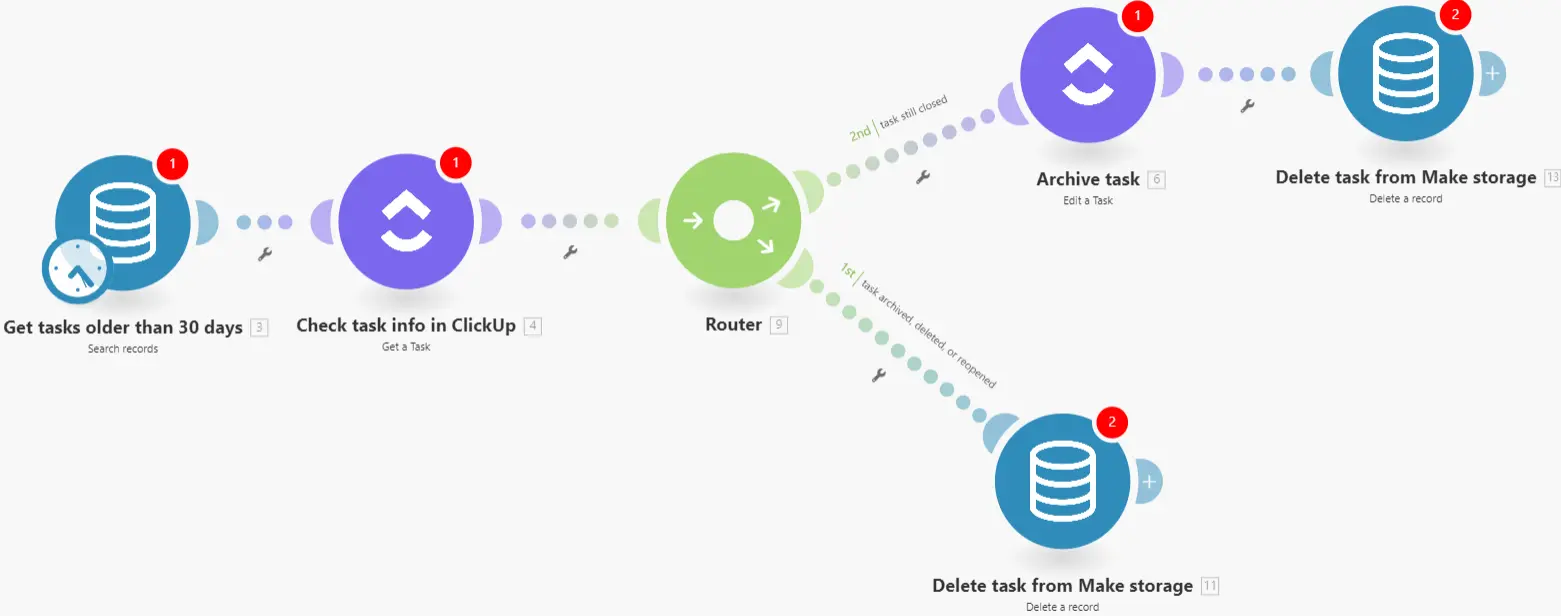
5. Add a ClickUp module to "Get a Task."
6. Use the task ID from the data store to check the current status of each task.
7. Add another ClickUp module to "Update a Task."
8.Set this to only run if the task is still closed.
9. Configure it to archive the task.
10. Add a final step to delete the task information from your Make.com data store.
Handling Different Situations
Your automation needs to be smart enough to handle a few different scenarios:
- Task is still closed: Archive it and remove it from the Make.com data store.
- Task has been reopened: Unarchive the task in ClickUp if needed, and remove it from the Make.com data store.
- Task has been deleted or already archived: Disable further actions and just remove it from the Make.com data store
To do this, you'll need to add some "if-then" logic to your Make.com scenario. This might seem complicated, but Make.com has tools to help you set this up.
Testing Your Automation
After you've set everything up, it's important to test it:
- Close a task in ClickUp and check if it shows up in your Make.com data store.
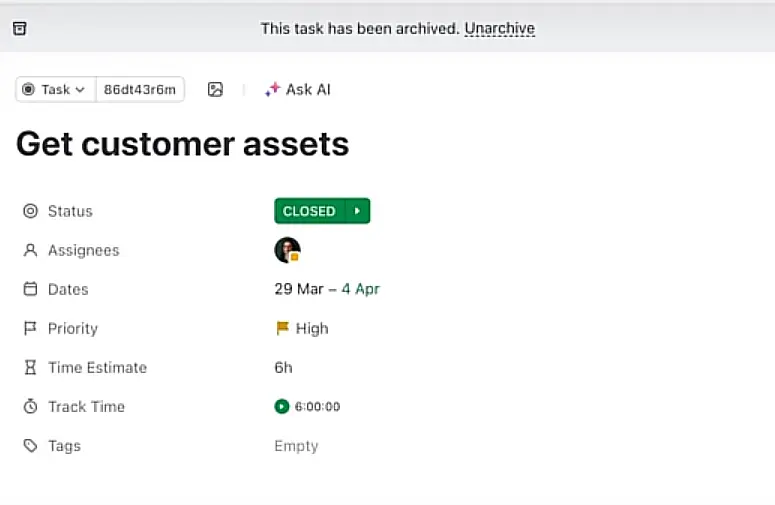
2. Manually add a test record to your data store with a date from more than 30 days ago.
3. Run your archiving scenario and see if it correctly handles different types of tasks.
Don't worry if it doesn't work perfectly the first time. You might need to tweak things a bit to get it just right.
Customization Options
While our guide focuses on a 30-day archiving period, you can easily customize this to fit your needs:
- Longer Archiving Periods: Change the filter in Step 2 of Part 2 to archive tasks after 60, 90, or even 365 days.
- Status-Based Archiving: Modify the filters to archive tasks based on specific statuses or tags.
- Space or List-Specific Rules: Create multiple automations with different rules for various parts of your ClickUp workspace.
Conclusion
Automatically archiving tasks in ClickUp can significantly improve your workspace's organization and your team's productivity. While it may seem complex at first, this Make.com automation becomes a powerful, set-it-and-forget-it tool once established. By keeping your active tasks front and center, you'll maintain better focus and efficiency in your daily work.
Remember, effective task management is about more than just completing work—it's about maintaining a clear, organized system that supports your productivity. This automation is just one step towards optimizing your ClickUp experience.
Got a project with ClickUp?
Book a call Now 🗓️Supercharge your business today


