Introduction to ClickUp for Solopreneurs
Managing multiple businesses alone can be tough. As solopreneurs, your success often depends on doing more with less time. That's why having a clear and tailored personal productivity system makes a difference.
In this comprehensive guide, we'll explore how to optimize ClickUp as the ultimate tool for solopreneur. I'll share actionable tips on leveraging ClickUp's features to stay focused and efficient across all your projects.
Key Takeaways
- Personalize Your Workspace: Learn how to switch to a “Personal Workspace Layout” to streamline ClickUp for solo use.
- Enhance Focus with 'Me Mode': Utilize “Me Mode” to filter out distractions and focus solely on your tasks.
- Customize for Clarity: Set up a clear hierarchy and custom workflow statuses to align with your personal business processes.
- Optimize Views for Insights: Adjust ClickUp views like Kanban and Calendar to gain better insights and manage your tasks efficiently.
- Automate for Efficiency: Implement automation features in ClickUp to save time and boost productivity.
How can Solopreneurs Optimize ClickUp to Enhance Personal Productivity?
Solopreneurs can optimize ClickUp by enabling the “Personal Workspace Layout,” using “Me Mode” for focused task management, customizing workflow statuses, and implementing automation features. This tailored approach ensures a clutter-free, efficient environment that aligns with individual business needs.
Switch to “Personal Workspace Layout” | Solopreneurs exclusive filter
First thing first, turn on “Personal Workspace Layout”. This mode will remove or limit features designed for team collaboration.
Here's how you can activate it:
- On the top left, click on your workspace's name
- Go to settings
- Switch the “Personal Workspace Layout” button on
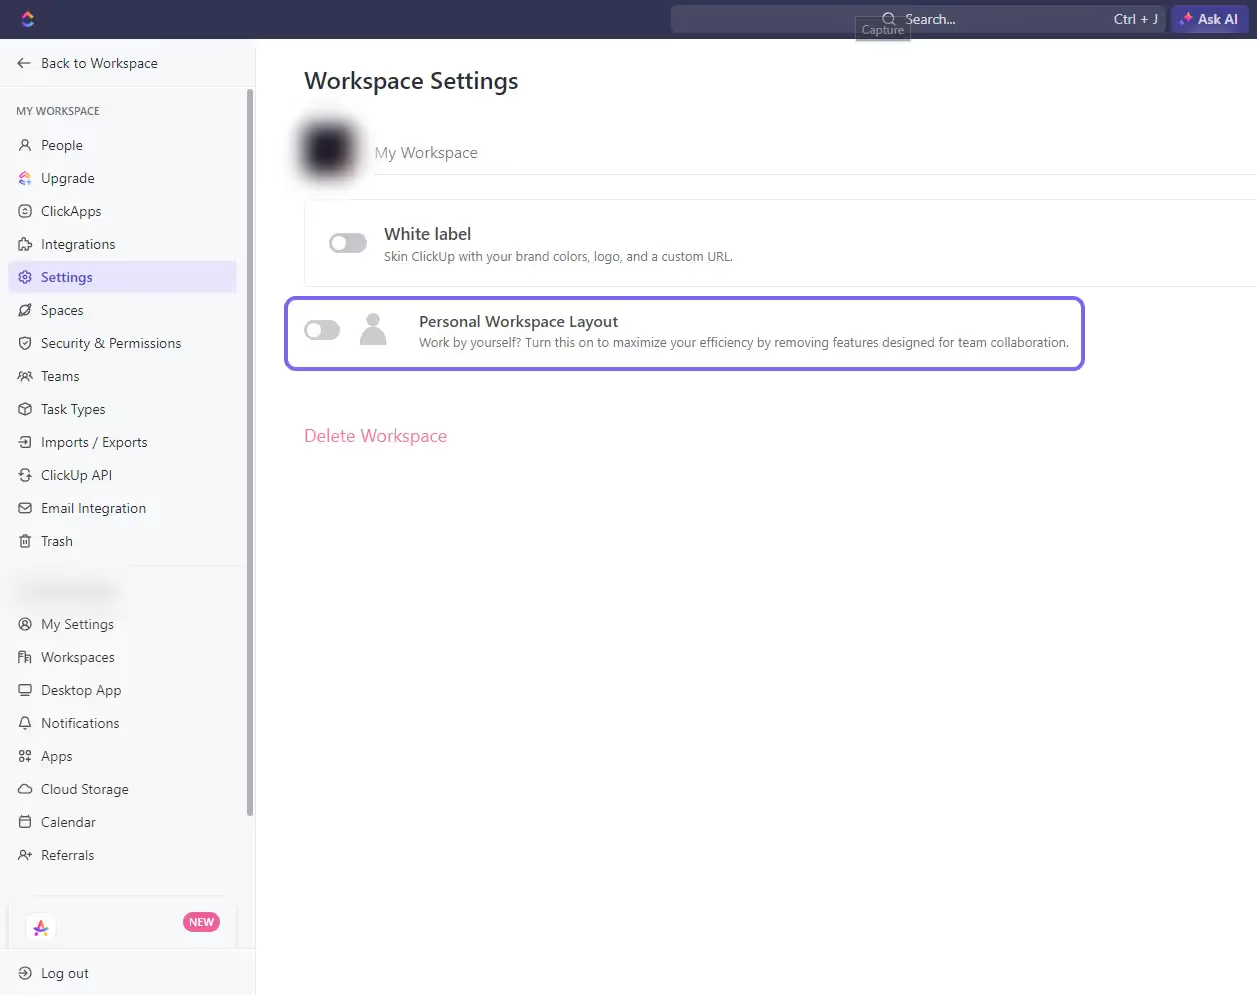
Switch Personal Workspace Layout on
The “Personal Workspace Layout” mode will deactivate “Assignees” and “Me Mode” filters from every view, making your workspace clean. Plus, every task created will be automatically assigned to you. Some ClickApps (like Pulse) won't be available, and the inbox and chat as well. But remember, you'll still have to customize views and filters for efficiency.
Use “Me Mode” in ClickUp for Solopreneurs
Although the Personal Workspace Layout mode will automatically activate “Me Mode”, it's still relevant to talk about its features. By filtering tasks, it will eliminate distraction so you can focus on your tasks.
“Me Mode” can be set to default in views, but it's still recommended to go further by customizing home, dashboard, sidebar, and linked items to exclusively show your tasks only. This strict personal approach removes all team elements from the interface, making ClickUp a perfect fit for solopreneurs and freelancers.
Organize your Hierarchy for Maximum Productivity
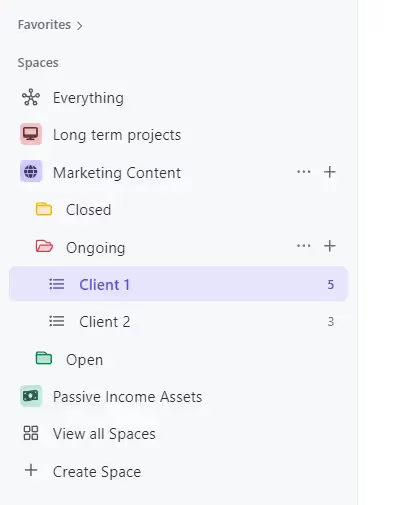
ClickUp hierarchy for solopreneurs and freelancers
Many make the mistake of using team hierarchy in ClickUp to manage personal workflows. But as solopreneurs, you need a setup focused on your unique needs.
Here are key guidelines on structuring ClickUp for simplicity and efficiency:
Understanding ClickUp Hierarchy : Space, Folder, List
Using ClickUp effectively means understanding its hierarchy level. It breaks down to workspaces, spaces, folders and lists.
Workspace is the highest level, acting as a completely separate environments that don't share information. Spaces are subdivisions inside a Workspace. As a solopreneur, you can use spaces to section your projects. Folders are a level of organization under spaces. They're mostly used to group related lists. Lists are the ones that hold tasks. All tasks created in ClickUp belong to a list.
Set Up Custom Workflow Statuses in ClickUp for Solopreneurs
Every business has a project lifecycle - a series of stages from start to finish. In ClickUp, you can model these workflows using custom statuses per space/folder/list. You can replace ClickUp's default “Open”, “In Progress”, “Closed” setup with more meaningful steps like “Customer Requirements”, “Production”, “Testing”, “Completion”, “Delivery” etc.
By setting custom statuses, you can track projects through a workflow according to your actual business processes.
Setting up status workflow and enable Progress icons ClickApp
Only Use 3 Spaces per Business and Consolidate Related Projects
Use a simple and clear hierarchy by limiting spaces to 3 per business. It will prevent complexity that large hierarchies create. You certainly want a streamlined system for individuals.
You must avoid having a separate ClickUp space for every single project. Analyze all of them and consolidate related ones under shared spaces marked by industry or function. For example, group together content marketing consultancy projects under a single Content Marketing space.
Categorize the 3 spaces per business by common traits like: priority, business function, revenue metrics etc. Examples could include Long term projects, Content Marketing projects, Passive income assets.
These categories are like productivity buckets. They help you sort and arrange tasks from different businesses by their importance or where they are in the business cycle.
Use Folders and Lists to Break Down Spaces in ClickUp for Solopreneurs
Once the spaces are set up, you'll have to break them down.
You can use folders to segment all of your projects by time. For example, you can split the content marketing space in three folders: Closed, Ongoing and Open. You can still keep track of your closed contracts as an archive. The Open one is for the contracts you're about to conclude.
Lists can be used to specify the actual projects. You might have 3 ongoing projects (clients, sales, etc.), transform them as lists where you can create actionable tasks and subtasks.
Optimize Your List View for Better Task Management
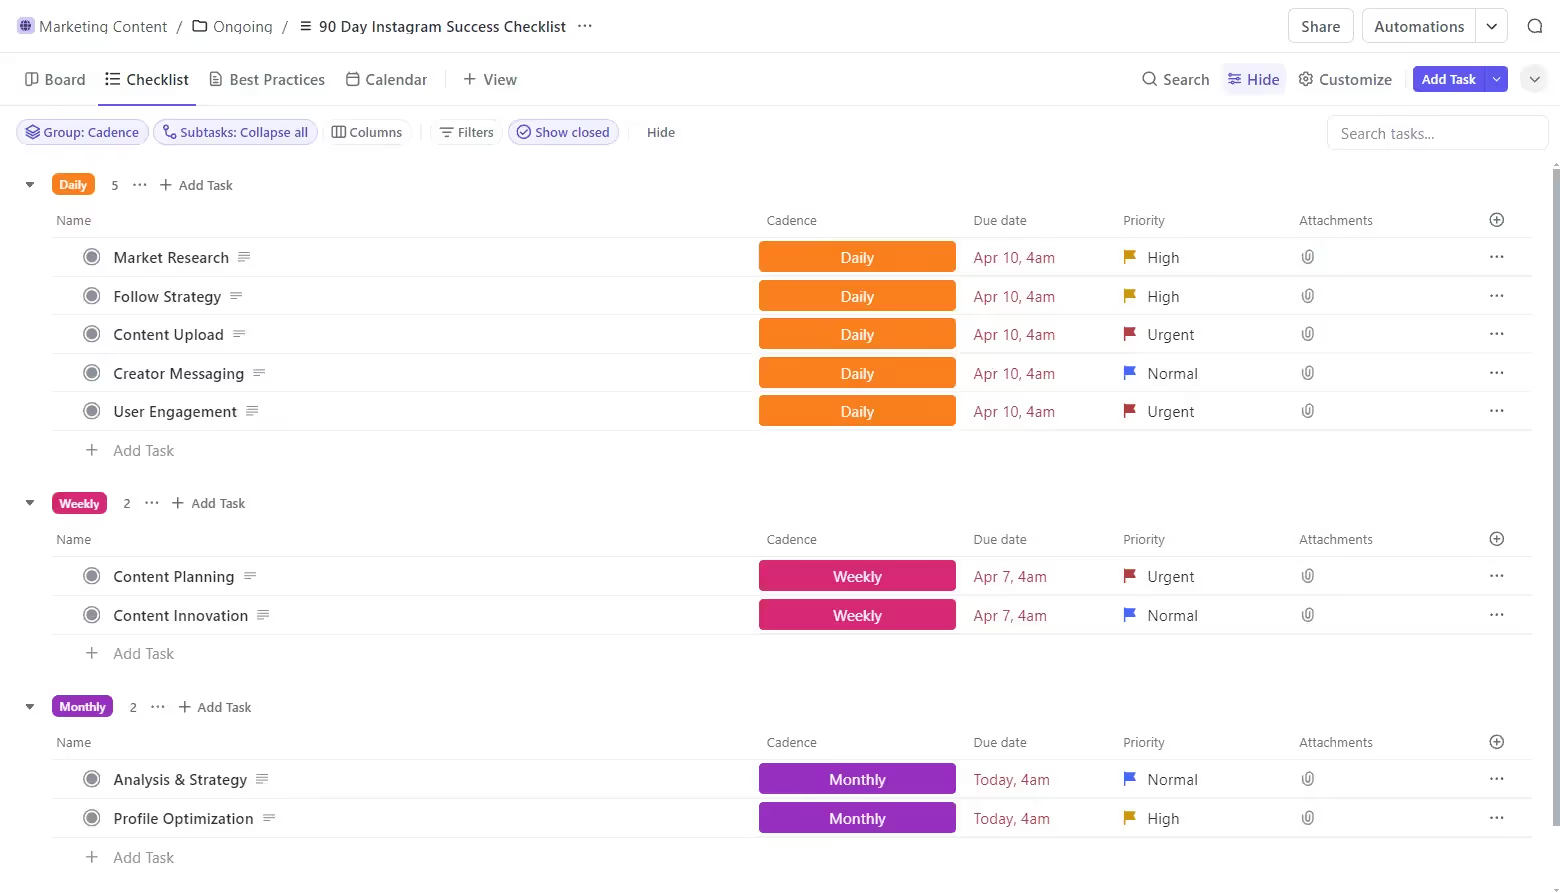
ClickUp List view with tasks sorted by candence and priority
For solopreneurs, working without structure may lead to failure. You need to design meaningful lists to scope and sequence everyday output.
Here are powerful ways to set up a streamlined structure:
Breakdown Priorities and Objectives into Tasks and Subtasks
Goals and priorities mean nothing unless they're broken down into specific executable tasks. As the main view in ClickUp, the list view should be optimized. Most of the time, you'll be dealing with this view. Make sure to keep it organized for maximum productivity.
Don't add vague, big actions like “Grow social media following”. Break them down instead. E.g. “Research ideal hashtags”, “Produce 12x social media assets”. If needed, you can even add subtasks.
Group Tasks By Importance and Due Dates
Add due dates and priority attributes like Urgent, High, Medium, Low. This combination will help you stay organized in the completion of your tasks. A list full of crucial information is what you really need as a solopreneur and a freelancer. No extra, just the essential. Now you can manage your time without guesswork.
Use Business and Project Tags for Consolidated Views
Despite consolidating multiple businesses in shared spaces, you can still filter data by business and project using tags. Assign Tags like “Business”: Consulting or “Project”: Brand, Strategy, etc. for any task. Then filter your List view to see all tasks associated with the appropriate tag that you've just set.
Get Better Insights with Optimized ClickUp Views
Apart from list view, you can use the Kanban view, just like in Trello, to track progress for easy tasks visualization. Use calendar view for your marketing content, for example. If needed, you can also integrate Google Calendar into your ClickUp workspace. ClickUp not only saves you precious time but also leverages AI to connect your tasks, docs, and people for better insights and management.
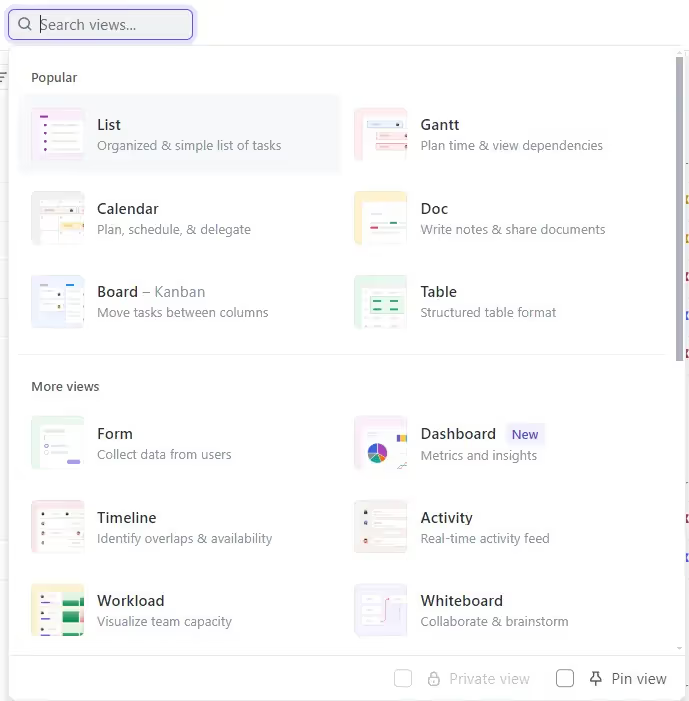
Different ClickUp views
With dependencies, due dates, filtering and tags, you can use views efficiently to have better insights: filter high priority tasks, overdue tasks and group them by tags.
Streamline Your Business Processes with Automation Features
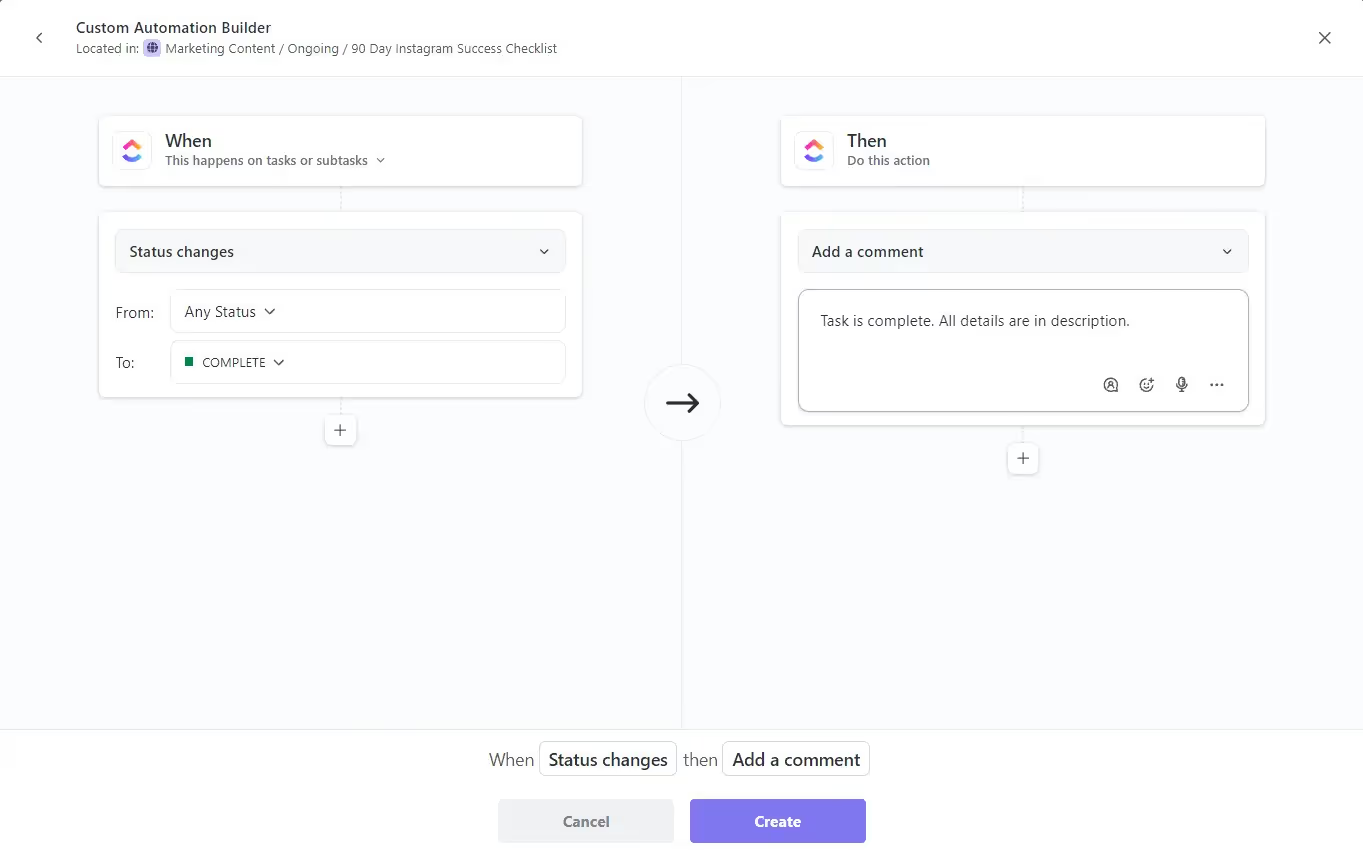
Automation builder in ClickUp
Using ClickUp should help you automate your systems to run smoothly. That's why using automation will instantly increase your productivity.
Here are the two automation categories you can set up:
Conditional Automations
The “when then” rules standardize workflows by triggering actions based on conditional logic. For example, automatically change status when checklists are checked.
Enforcement Automations
Use these automations for optimized workspace. Apply rules like: assign a due date when task created, notify if no update 2 days before due date.
Now you've set up automations to help you manage your activity.
Customize Notifications & Updates in ClickUp for Solopreneurs
Getting notified with not needed updates can be a burden. That's why customizing notifications prevents constant breaks without missing crucial alerts.
Here are ways to tweak notifications to stay focused:
Limit Email Flow to Twice Daily
Control email delivery windows like morning and evening rather than individual email per update.
Remove Non-Critical App Alerts and Use Notification Filters
In browser or mobile app notification settings, disable notifications with no productivity relevance. Keep only priority updates like due dates reminder, priority changes, etc.
Filter notifications out by priority or relevance to stay focused. For example, tasks with legal deadline should be treated first.
Use Status Based Email/In App Alert Automations
You can also automate notifications within workflow stages. Automatically notify when a task enters “Testing” status so you can review progress, for example.
Conclusion
Following these tips should help you make the most of ClickUp for managing multiple businesses as a solo entrepreneur. You should avoid copying how teams use it.
You should customize ClickUp to fit your own workflows and way of working. Voilà, you're all set to be productive!
Let me know the challenges you face in managing tasks as solopreneur so that we can share ideas for making ClickUp fit our needs.
