

Introduction
As an agency owner or project manager, it's crucial to ensure your team works at optimal capacity. Overloading leads to burnout and missed deadlines, while underutilizing resources results in lost revenue. This is where ClickUp's Workload View comes in - a tool for visualizing and managing your team's capacity.
This guide covers everything you need to know to master ClickUp's Workload View and improve your agency's capacity planning. You'll learn how to set up the view with the right data and use it for strategic decision-making to keep your team efficient.
In this guide, we'll cover:
- Why capacity planning matters for agencies
- How to set up the Workload View in ClickUp
- Two approaches to capacity planning: time estimation vs. the BATCH method
- Using the Workload View to inform strategic decisions
- Tips for continuous improvement
Key Takeaways
- Effective capacity planning prevents burnout, meets deadlines, optimizes resources, and supports data-driven hiring.
- ClickUp's Workload View lets you see and manage your team's workload so you can allocate work effectively.
- The guide covers two approaches: the classic Time estimation method and the simpler, more efficient BATCH method.
Why Capacity Planning Matters for Agencies?
Workload View in ClickUp
First, you need to know why capacity planning is crucial for agencies.
Effective capacity planning enables you to:
- Prevent burnout: Distribute work equally and avoid overloading to keep your team engaged.
- Meet deadlines: A clear view of capacity helps you deliver on time.
- Optimize resources: Identify team members with less work and assign tasks strategically to optimize billable hours.
- Make data-driven hiring decisions: Forecast future capacity needs in order to expand your team at the right time.
In short, capacity planning is key to a profitable, sustainable agency. And ClickUp's Workload View is the tool that makes it possible.
Prerequisite: Setting up the Workload view in ClickUp
The first step in capacity planning with ClickUp is to set up the Workload view. Here's how:
- Go to the Everything/Space/Folder level in the left sidebar of your ClickUp Workspace.
- Click the + View button and select Workload.
- Give a name to the view, such as "Team Capacity", to create the view.
Creating Workload View in ClickUp
Tip: Create your Workload view at the Everything or Space level to get a comprehensive overview of all active work across your Workspace or Department.
Once you've created the Workload view, customize it:
- Show subtasks to ensure all work is accounted for
- Display weekends to catch tasks that fall on non-work days
- Set custom capacities for team members with different work schedules
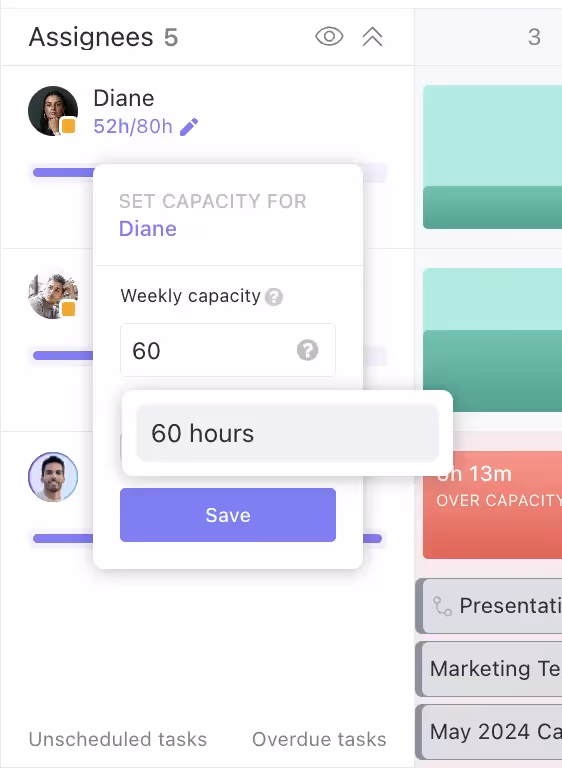
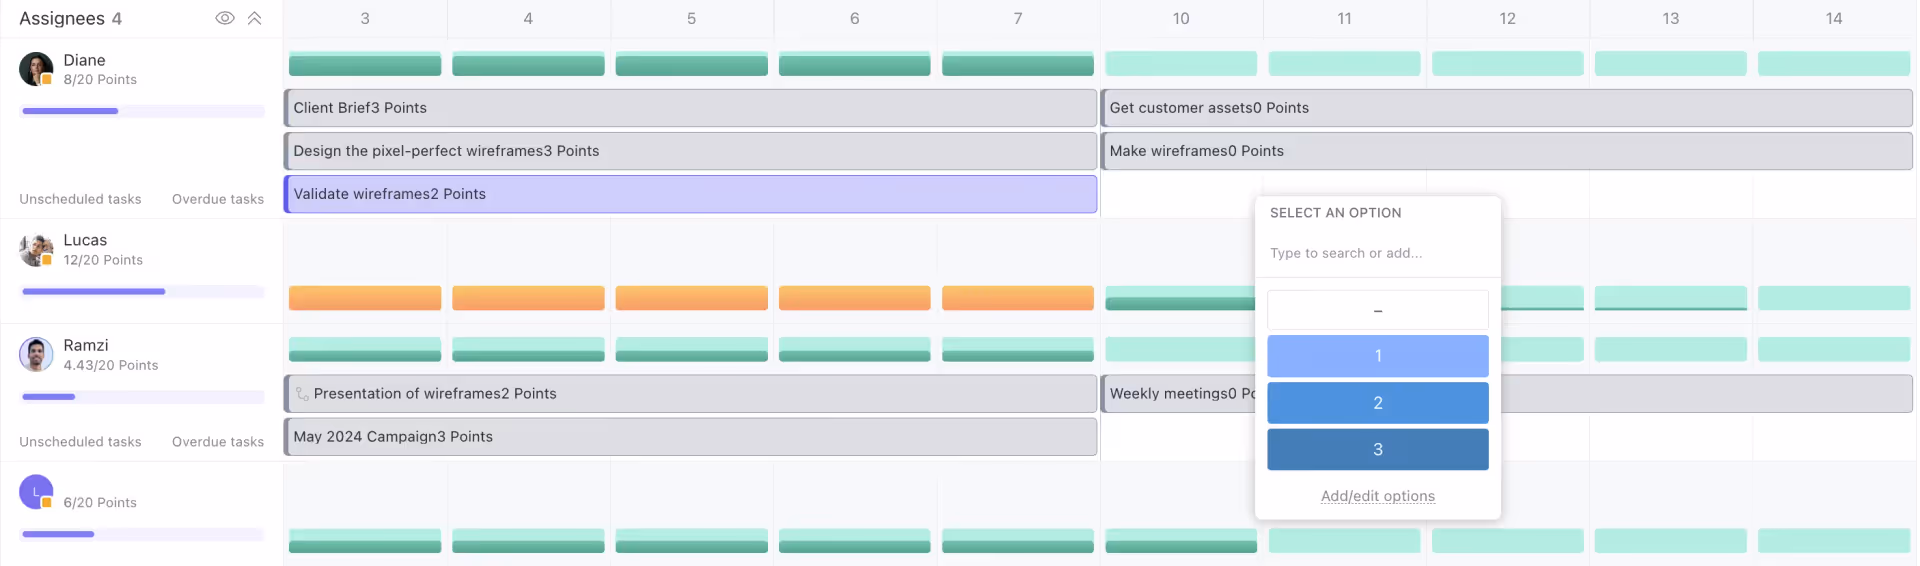
Setting capacity for assignees
The classic method : Time estimation
The traditional approach consists of estimating how long tasks will take (hours or days) and assigning them based on team's availability. This method uses ClickUp's time tracking features and requires updating task estimates, assignees, and due dates.
While effective, this approach can be time-consuming and may not always reflect the true complexity of tasks, especially for larger projects. It also requires consistent updates to task data to keep an accurate view of team capacity.
Overcapacity tracking inside ClickUp's Workload View
Step 1: Enabling time tracking features
To leverage ClickUp's capacity planning capabilities, you need to enable time tracking features:
- Go to your Space Settings > ClickApps.
- Enable the Time Tracking ClickApp.
- Set preferences like time format and default billable rates.
Time Tracking ClickApp
With time tracking on, team members can log time on tasks, giving you valuable data for planning. Accurate time tracking data is essential for reliable capacity forecasts.
Encourage your team to log their time on tasks. Set up reminders or integrate time tracking tools to streamline this process.
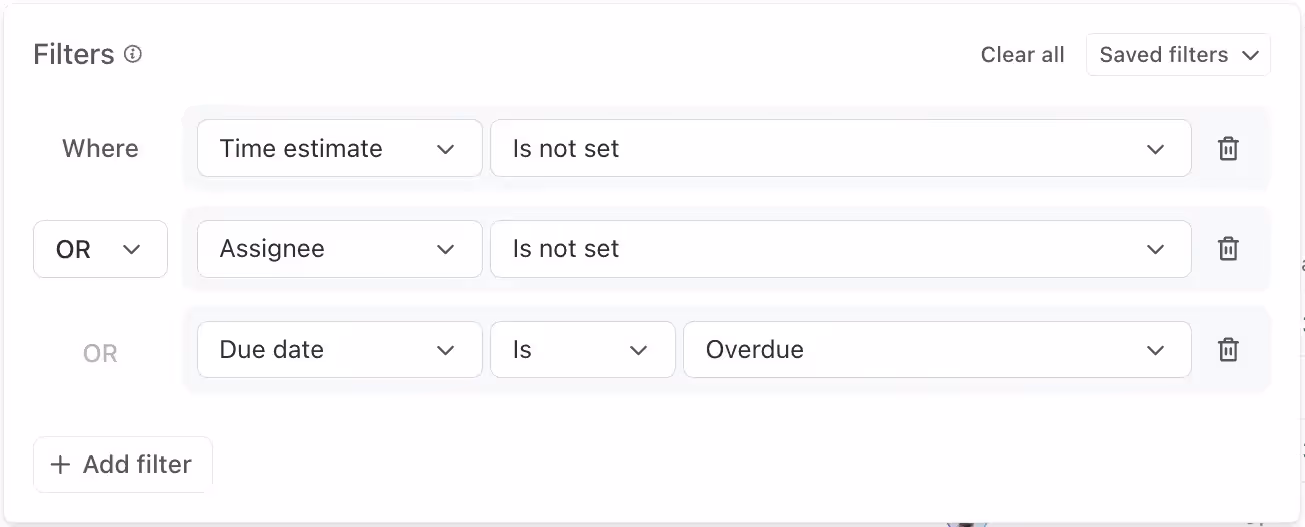
Step 2: Ensure All Tasks Have Estimates, Assignees, and Due Dates
Your Workload View is only as good as the data in it. To show tasks accurately, they must have three key elements:
- Time Estimates: How long the task should take in hours or days.
- Assignees: The team member(s) responsible for the task.
- Due Dates: When the task needs to be done. Set due dates to ensure clarity and avoid overloading. While start dates help with planning, treat the due date as the day to complete the task. This way, you know exactly what needs to be done each day.
Leaving any of these fields blank can impact your capacity planning accuracy. Ensure every task, no matter how small, includes these elements.
Establish a policy that no task can advance without a time estimate, an assignee and a due date.
Step 3: Break Down Large Tasks into Manageable Subtasks
Large, complex tasks can make your Workload View difficult to read. The solution? Break them into smaller, more actionable tasks and subtasks.
No task should exceed 4 hours of estimation. If it does, split it into phases or components and assign each a separate estimate, assignee, and due date.
Step 4: Leverage ClickUp's Automation Features
Manually updating task data can be tedious and time-consuming. Luckily, ClickUp offers automation features to make it easier:
- Custom Task Templates: Create reusable templates with pre-populated estimates, assignees, and due dates for common tasks.
- Recurring Tasks: Set up tasks to automatically recreate on a regular basis, perfect for ongoing responsibilities like weekly meetings or monthly reports.
- Automated workflows: Explore ClickUp's library of pre-built automations, like auto-assigning tasks based on custom fields or updating due dates when subtasks are done. You can also create new ones.
Using these automation features keeps your Workload View updated and accurate.
Step 5: Permanent Audit and updates
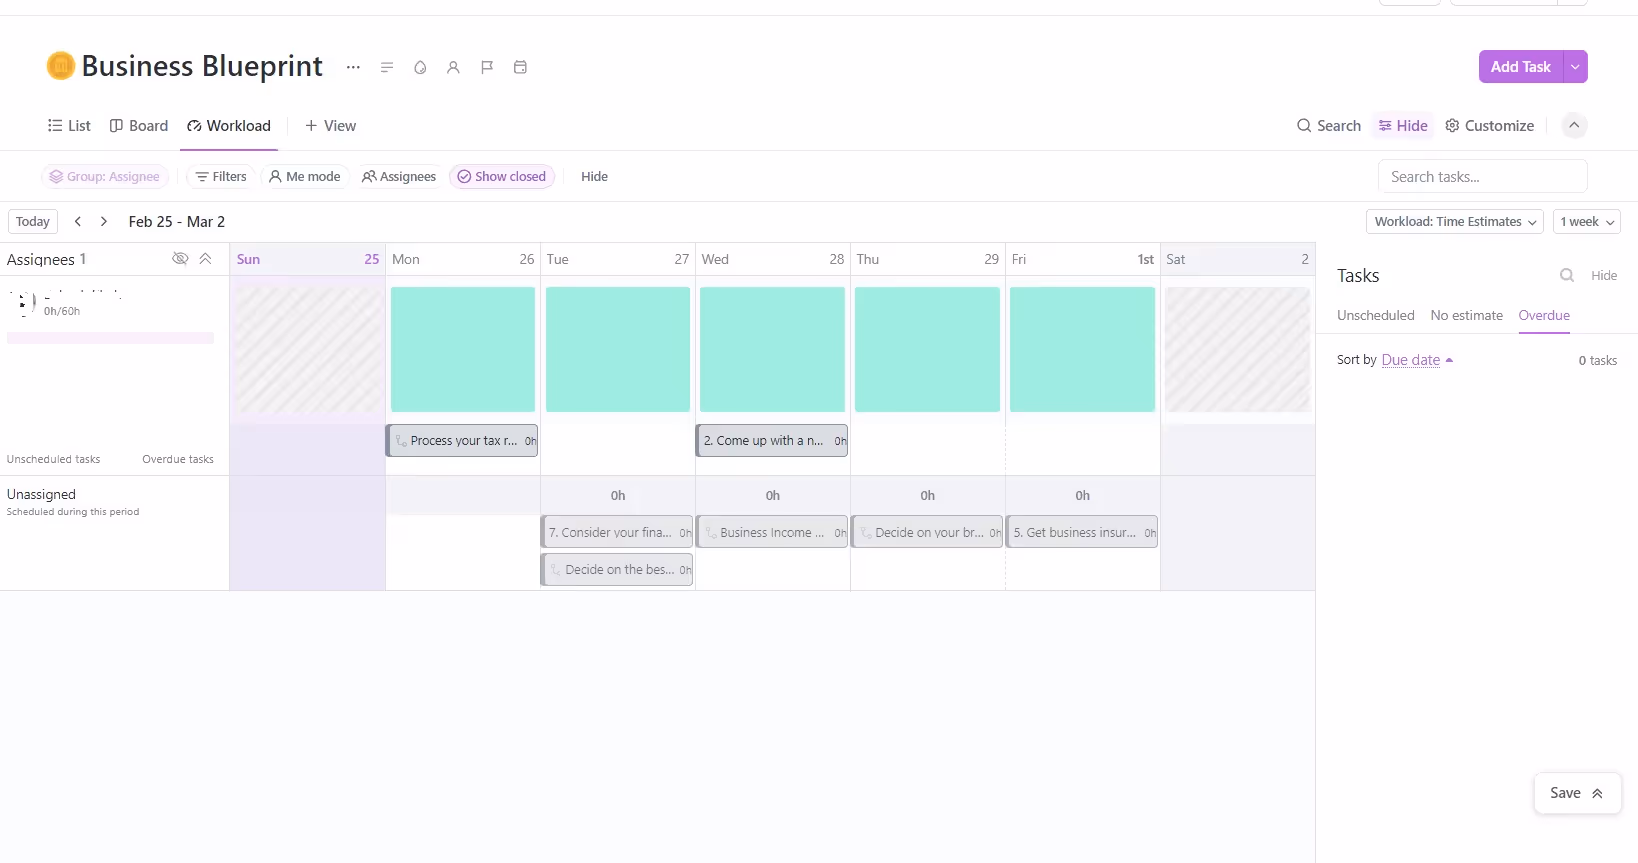
Even with the right setup, your Workload View can become inaccurate if tasks aren't regularly audited and updated. Missed due dates, incomplete time estimates, and unassigned tasks can distort your view of team capacity.
Set Best Practices filter in Workload View
Here are 3 tips to solve this:
- Use a 'Best Practices' filter in ClickUp to find tasks missing key details like due dates, assignees, or estimates. Once set, you can use dashboard view to display them.
- Assign a "ClickUp Champion" to regularly review this view and follow up with task assignees to keep everything up-to-date.
- Make "Workload Refresh" a routine part of your weekly team meeting. Quickly review upcoming tasks and identify any missing details.
An alternative: Using the BATCH Method for Efficient Capacity Planning
BATCH method overview in ClickUp
With your Workload View set up and filled with data, it's time to put it to work for capacity planning.
One effective approach is the BATCH method, which involves organizing tasks into focused batches for maximum efficiency. Instead of estimating tasks by time, use a unit of points.
Here's how it works:
BATCH is an acronym that represents the key steps of this workload management approach:
Break Down: Break projects into smaller, manageable tasks and subtasks.
Automate: Use templates and automations to make task creation and management easier.
Time Block: Assign batches of tasks to specific time slots for focused execution.
Consolidate: Group related tasks into batches for efficient handling.
Handle: Work on tasks in each batch, reducing context switching and boosting productivity.
Step 1: Break Down Projects into Tasks
The first step in BATCH is to break your projects into clear, actionable tasks and subtasks.
Follow these guidelines:
- Avoid vague tasks like "Design website". Instead, list specific pages, features, and assets needed.
- Keep subtasks small enough to finish in one focused work session.
- Organize tasks within your project management tool (e.g. ClickUp) under their respective projects.
- Don't worry about assigning start and end dates for every subtask at this stage; you'll group them into time blocks later.
Step 2: Automate Task Creation and Management
Automating task creation and management can save significant time and effort. Leverage ClickUp's automation features to streamline this process:
Task Templates
- Create project templates with common tasks for recurring projects (e.g., website builds, marketing campaigns).
- Include pre-assigned tasks, time estimates, and due dates in your templates.
- When starting a new project, just use the relevant template to add the necessary tasks.
Automations
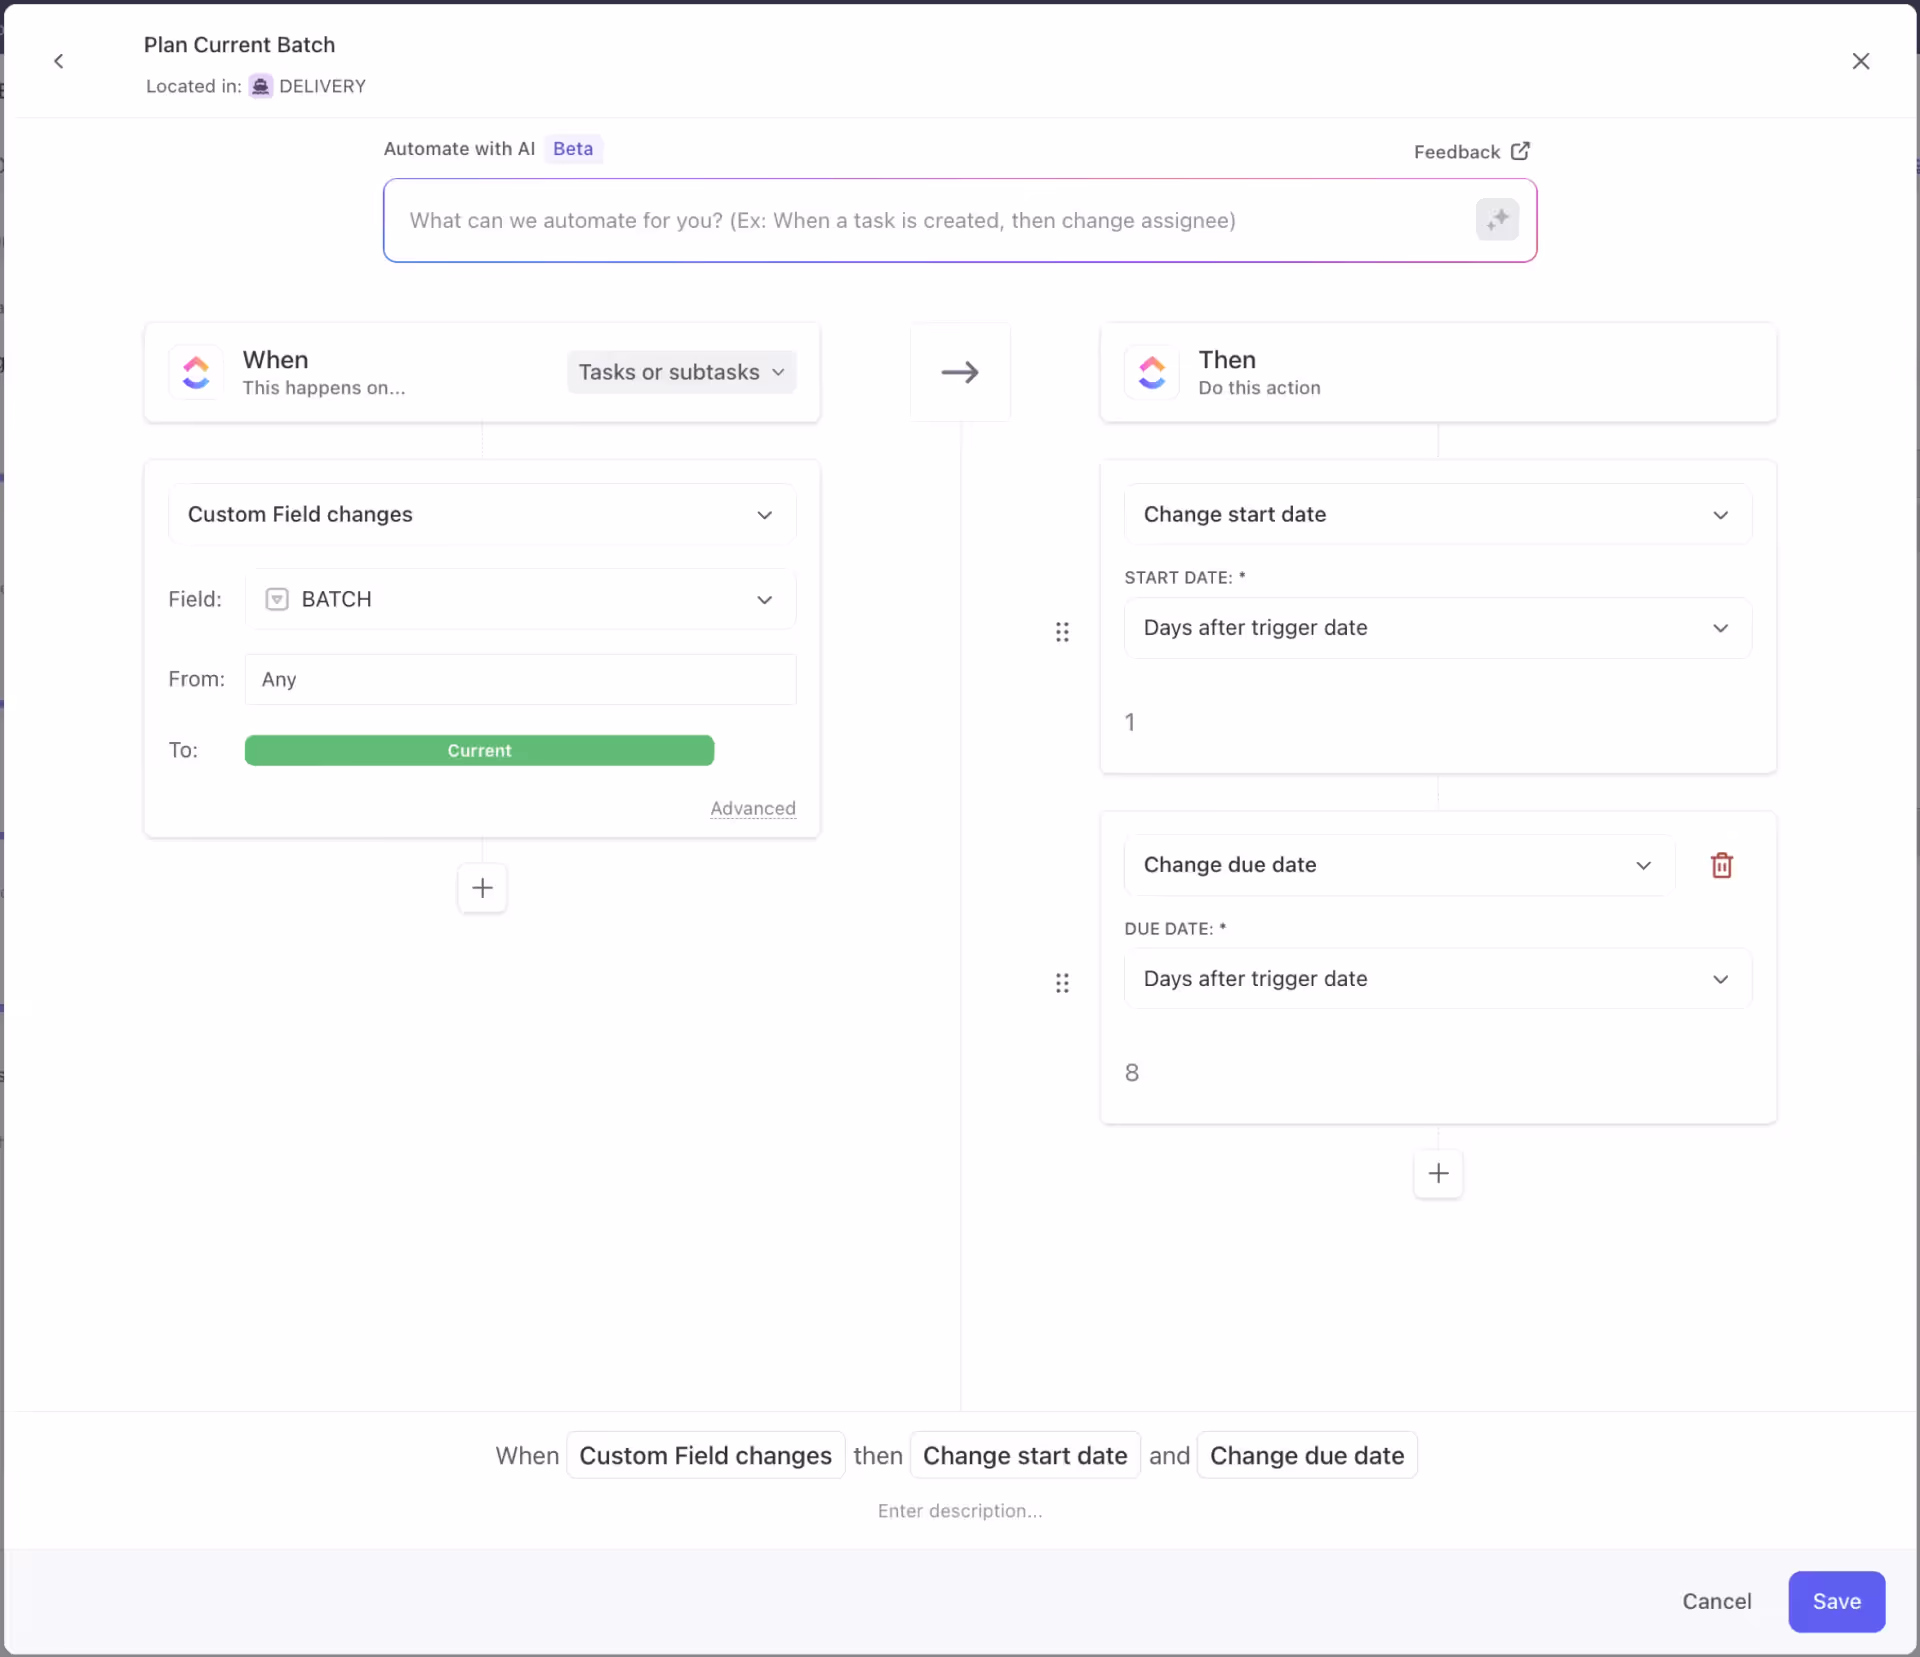
ClickUp's automation builder
Set up automations in ClickUp to further streamline task management:
- Automatic Task Scheduling: When a task is created, automatically assign start and end dates for the current or next week.
- Task Assignment: When a task is completed, automatically assign the next task to the right team member.
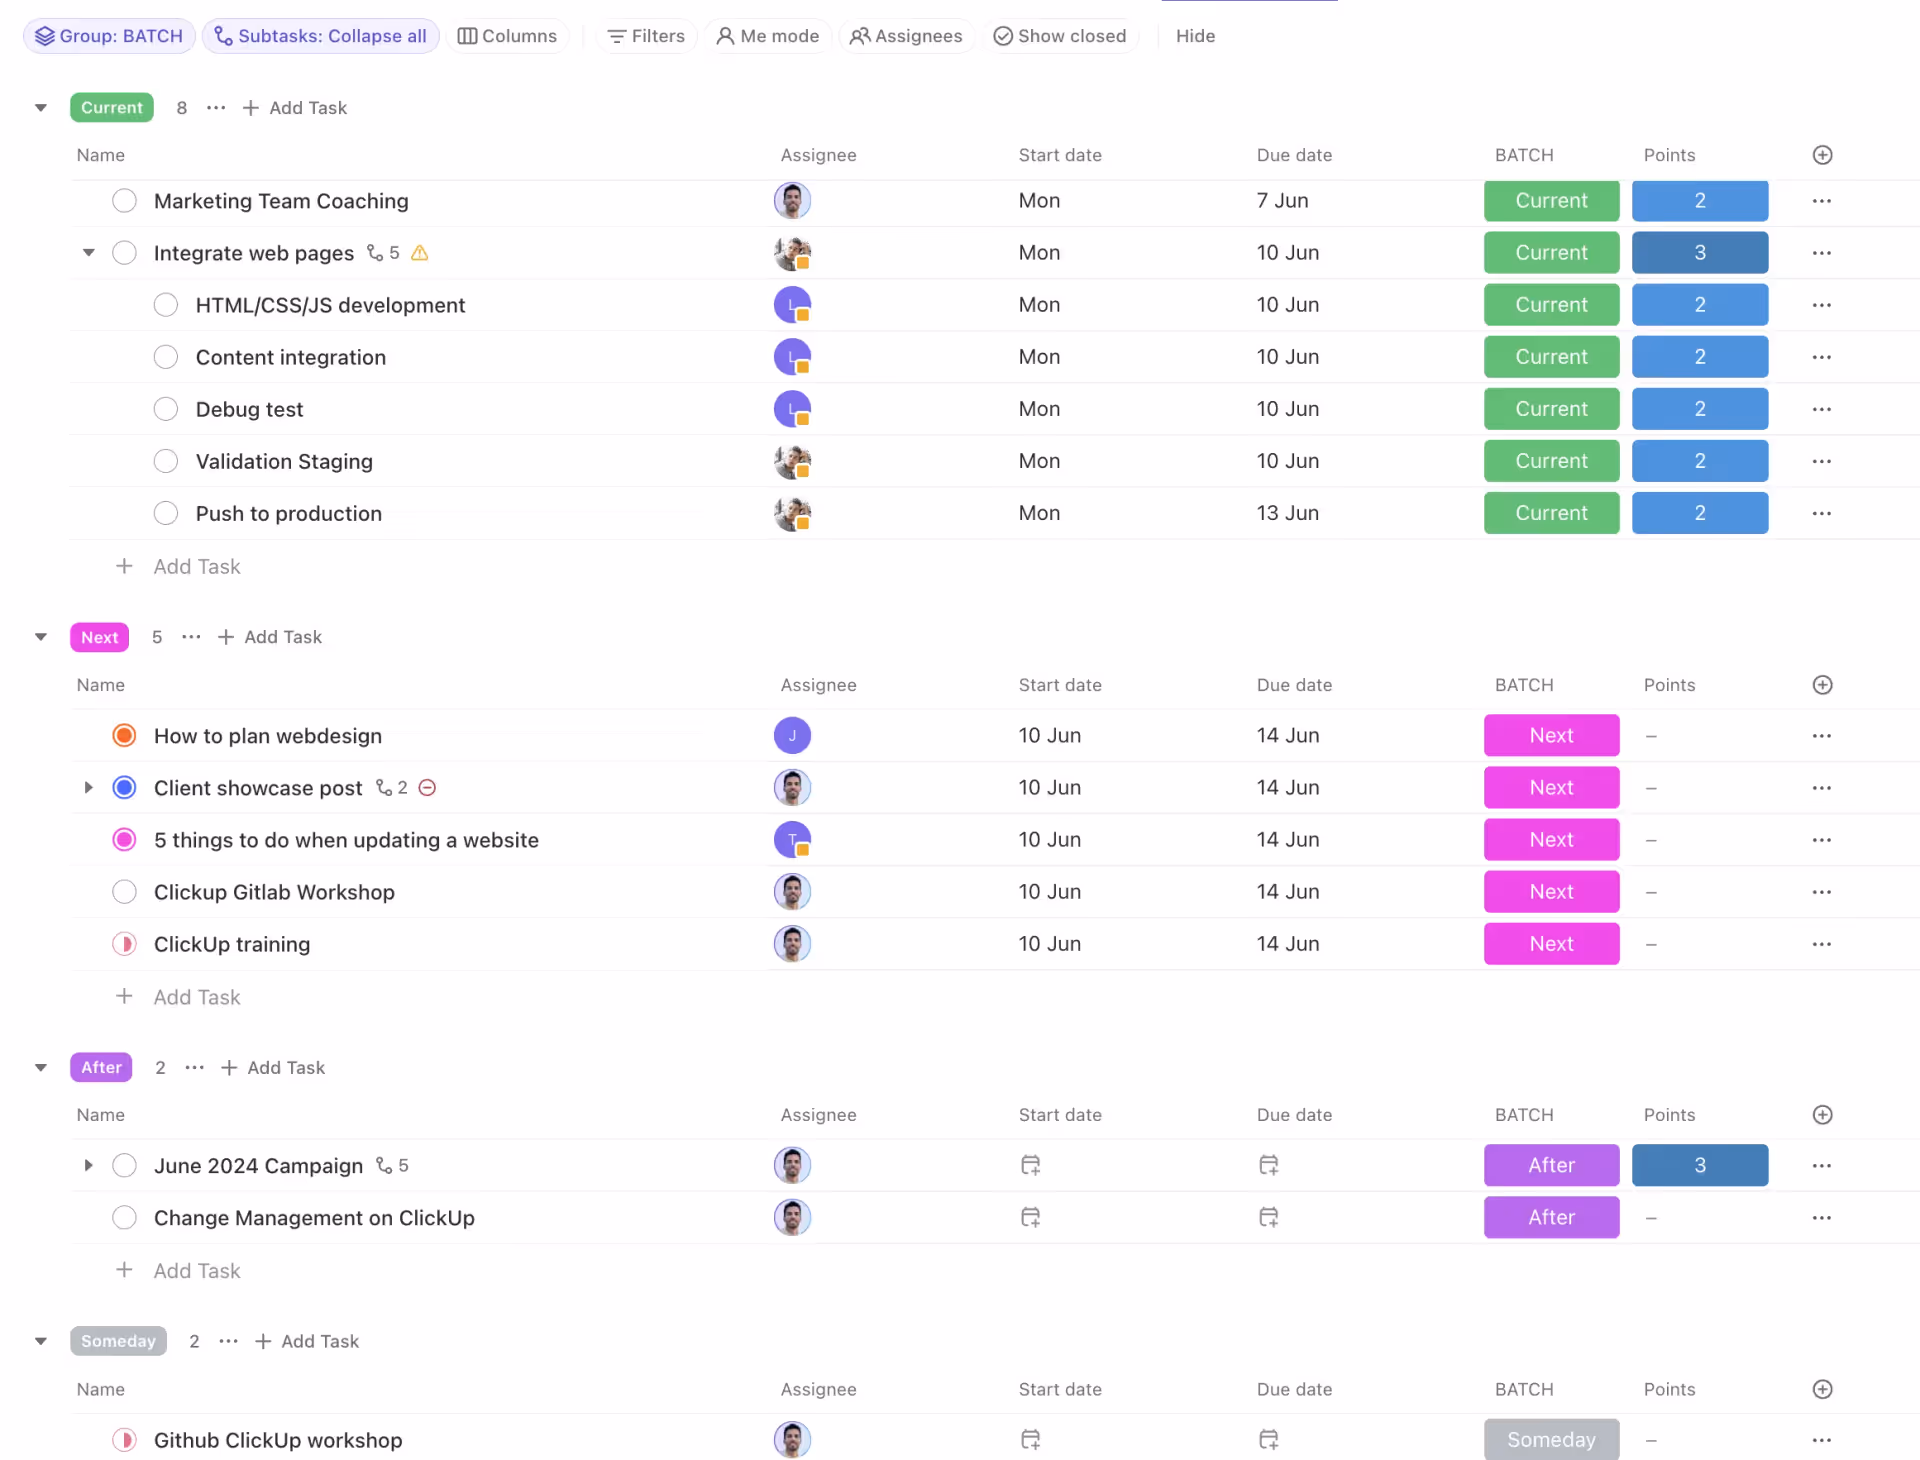
- Batch Tagging: Create a custom field called "Current Batch" and automatically tag tasks for the current time block.
- Default Due Dates: For example, set the start date of tasks to +1 day and the end date to +5 days to automate project planning.
Step 3: Assign Tasks to Weekly Time Blocks
Instead of allowing work to drag on, actively assign task batches to focused time blocks:
- Weekly Planning Session: Hold a weekly planning session to assign task batches to time blocks for the upcoming week.
- Prioritize Tasks: Schedule high-priority and deadline-driven tasks first, then fill in with other tasks if there's room.
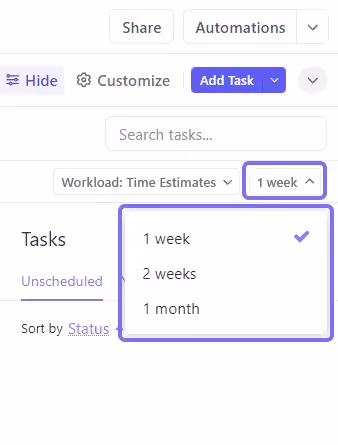
- Use a Monthly View: Use ClickUp's monthly view to see how tasks are spread across the team.
Set time scope in ClickUp's Workload View
- Task Estimation: Use a simple 1-2-3 scale to estimate each task:
- 1 = Quick task (less than an hour)
- 2 = Medium task (a few hours)
- 3 = Big task (most of the day)
- If a task is larger than a 3, consider breaking it down further.
- Capacity Planning: Limit each team member's weekly capacity to around 15 points to avoid overloading them.
Setting task points in Workload View
Step 4: Consolidate Related Batches (Prepare for Next Time Block)
To make handoffs and organization easier, group related tasks into batches for the upcoming week:
- End of Planning Meeting: At the end of each weekly planning meeting, prepare the next week's batch of tasks.
- Prioritize Tasks: Prioritize tasks based on importance and urgency.
- Identify Dependencies: Identify any dependencies that may impact the next week's tasks.
- Group Similar Tasks: Group similar tasks that require the same resources or mindset to minimize context switching.
- Assign Batches: Assign consolidated batches of related tasks to the same person to maximize accountability and efficiency.
Step 5: Execute Tasks and Collaborate
When it's time to execute, encourage your team to focus on one batch at a time and collaborate asynchronously:
- Batch Focus: Avoid switching between different kinds of tasks; focus on one batch at a time.
- Time Tracking: Use ClickUp's time tracking feature to log time spent on each task and improve future estimation accuracy.
- Task Splitting: If a task is taking significantly longer than expected, consider breaking the remaining work into subtasks and pushing it to a future batch.
- Collaboration: Avoid frequent meetings and rely on asynchronous updates and progress tracking within ClickUp.
- Progress Updates: Post progress updates in ClickUp comments, allowing stakeholders to stay informed without interrupting the team's flow.
Continuous Improvement
The BATCH method is designed to evolve and improve as you refine your processes:
- Regular Retrospectives: Hold retrospective meetings to review previous weeks and identify areas for improvement in batch planning, handling, and execution.
- Estimation Adjustments: Watch for tasks or projects that consistently take longer than estimated, and adjust future plans accordingly.
- Prevent Loss: Identify factors that lead to lost work or rework, and develop processes to avoid them in the future.
- Collaborative Refinement: Encourage team members to suggest tweaks to batch groupings, time block assignments, task breakdowns, and other aspects.
By following the BATCH method and leveraging ClickUp's features, teams can stay organized, minimize distractions, and maximize productivity while tackling complex projects.
Real-World Example: Website Development Project
To illustrate the BATCH method, let's consider a website development project for a small business client.
Break Down: The project is broken down into tasks such as "Design homepage," "Develop contact form," "Integrate e-commerce functionality," and "Optimize for SEO."
Automate: A website development template is created in ClickUp, pre-populated with common subtasks, time estimates, and due dates. Automations schedule tasks and assign them automatically.
Time Block: During the weekly planning session, high-priority tasks like "Design homepage" and "Develop contact form" are put into the upcoming week's time blocks, estimated as 3-point tasks. Lower-priority tasks like "Optimize for SEO" are scheduled for later weeks.
Consolidate: The design tasks are consolidated into a "Design" Batch and assigned to the lead designer for the upcoming week. Development tasks are grouped into a "Development" Batch and assigned to the lead developer.
Handle: The design team focuses solely on the "Design" Batch for the week, minimizing context switching and maximizing productivity. Progress updates are shared interactively in ClickUp comments.
Continuous Improvement: During the retrospective, the team identifies that design tasks were consistently underestimated. They adjust their estimation and consider breaking down larger design tasks into subtasks for better accuracy.
Accounting for Non-productive Time
Whether you're using the classic Time estimation method or the BATCH approach, you can't overlook non-billable activities that drain your team's energy. We're talking about all those little things that often go untracked but quickly add up - internal meetings, training sessions, personal admin tasks, even those casual talks...
There are two main ways to handle this "slack time" and ensure your workload visibility remains crystal clear:
Option 1: Log Every Little Thing
If you really want an accurate view of your team's availability, the simplest approach is to capture all non-billable tasks in ClickUp, just like you would for client work. Create templates for recurring meetings, training sessions, and other internal requests. Use recurring tasks to account for daily administrative overhead like email triage and team check-ins. And don't forget to block off time for professional development opportunities.
The upside? You get a truly comprehensive picture of where your team's time is going. The downside? It requires a lot of diligence in tracking every little task that isn't client-billable.
Option 2: Reduce actual work time
Let's be honest, logging every non-billable minute isn't always practical or necessary. So here's the easier, more pragmatic approach: assume that your team operates at, say, 80% capacity to account for slack time.
So instead of forecasting against 40 hours or 15 points per week, you'd plan against 32 hours or 12 points.
The numbers here aren't set in stone - you'll want to run some analysis on your historical time logs to determine a reasonable portion for non-billable activities at your agency. But applying this reduction lets you incorporate slack time into your workload forecasting without going overboard on granular task tracking.
The choice comes down to your agency's preferences around detail vs. simplicity. Either approach will give you a much clearer view of your real workforce capacity compared to just looking at billable work.
Leveraging the Workload View for Strategic Decision-Making
In addition to tactical capacity planning, ClickUp's Workload View can also inform big-picture strategic decisions for your agency:
Identify Skill Gaps and Training Opportunities
Notice a particular team member is consistently under-allocated? They may have skills that could be put to use on other project types. Conversely, team members who are frequently overallocated may benefit from additional training or support to level up their efficiency.
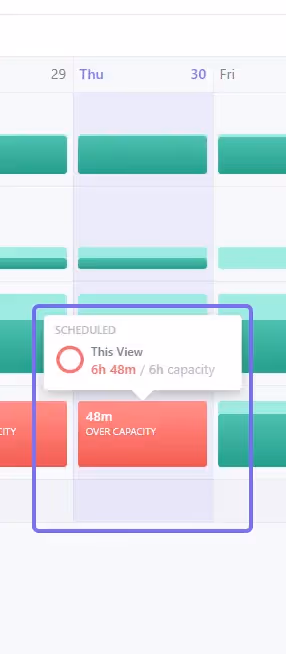
Overcapacity
Forecast Hiring Needs
If you notice certain roles or skill sets are consistently in high-demand and short supply, it may be time to expand your team. Use historical Workload View data to build a case for hiring and ensure you're staffing up at the right time to meet client needs.
Optimize Project Pricing and Scoping
Compare estimated vs. actual hours logged on past projects to identify areas where you may be under or over-pricing. Use these insights to refine your pricing models and project scopes to ensure profitability.
Communicate Proactively with Clients
When you have a clear view of team capacity, you can be proactive in communicating with clients about timelines and deliverables. Use Workload View data to set realistic expectations and provide transparency around any potential delays or bottlenecks.
Conclusion
Mastering ClickUp's Workload View - and effective capacity planning - requires an investment of time and discipline. But the payoffs in team productivity, on-time deliveries, profitability, and strategic resource management are significant.
Take an iterative approach, experiment with the methods and optimizations that we've covered. Implement ongoing feedback to continuously improve your processes. And make capacity planning a priority from the bottom. The impacts will benefit every aspect of your business.